UPX Packed Headaches

Researching malware has many challenges. One of those challenges is obfuscated code and intentionally corrupted binaries. To address challenges like this, we've written a small tool in C that could fix intentionally corrupted binaries automatically. We also plan to open-source the project so other researchers could use it too, and perhaps improve and expand upon the tool's capabilities as needed.
Intentionally corrupted
An example of this scheme entails packing a binary with the UPX packer and modifying key fields in the file's UPX header - typically the file size.
These modifications will allow the binary to run without problems if executed, but typically cause the UPX unpacking utility to throw errors and be unable to unpack the "mangled" binary. There are a few well-written blog posts on the subject of UPX packed binaries and some very nice tools for PE (Windows) executables, but there isn't a lot of information about UPX packed ELF (Linux) binaries or utilities (that we're aware of) that would perform some of these operations automatically.
Automated p_info patching
One of the common mangling techniques involves malware authors altering p_info headers to prevent the UPX tool from easily unpacking their malware. We decided to read through other researchers' blog posts on this subject, take notes, and then write a small tool in C that could fix these intentionally corrupted UPX binaries automatically. Ultimately, the goal was to open-source the project so that other researchers could leverage it, as well as improve and expand upon the tool's capabilities as needed.
The tool is very straightforward. It begins by reading the supplied binary into memory. Once in memory, it confirms that the binary is indeed packed by UPX, and locates the specific offsets of the corrupted fields. It then reads the UPX footer fields that contain the uncorrupted data needed to repair the entries and writes the good data over the corrupted data, repairing the file in memory. After these steps are complete, the final step is to write the repaired memory out to a file on disk using the original supplied files filename, and appending .fixed to the newly created file. All of this is done without modifying the original file.
It's very basic, as far as utilities go, but it's a start and automates processes that typically require manual inspection and patching.
How does that work?
We begin by identifying the UPX file header offsets in the binary. We expect the UPX header magic bytes sequence 0x55505821 which is "UPX!" in ASCII. We can scan the binary file looking for this sequence of bytes, and then calculate the offset to where the p_info field should appear in the UPX headers.
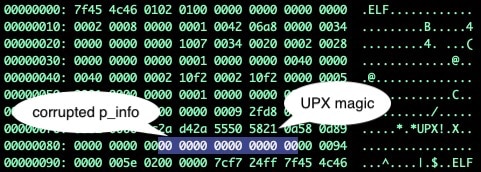 Fig. 1.) UPX magic and mangled p_info headers
In Figure 1, the magic bytes are present. The offset where we expect the p_info header fields have been filled with null bytes. To make this file unpackable, we'll need to repair these headers. The good news is that this information can be extracted from the file's footers.
Searching once again for the UPX! bytes sequence we find two more hits, the second and third hits both near the end of our file. Once we identify the third hits offset, we can move an additional 20 bytes past it, and we'll find a 4-byte value that is our p_filesize. If this p_filesize value doesn't match the p_info field at the start of the binary, we know these bytes have been corrupted.
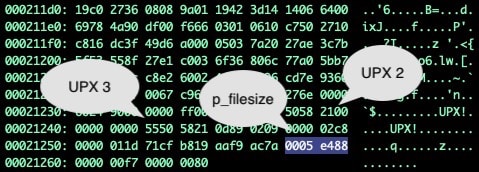 Fig 2.) UPX header values and offsets in hex dump
In our case, we know that the p_info value has been null filled, so we now knowing the valid value can overwrite the corrupted header values with the correct p_filesize value across the 8 corrupted bytes with our valid value(s) (0x0005ef880005ef88), repairing the damage and making the binary once again unpackable.
Testing the tool in the real world
In the following example, we have a piece of malware that has leveraged this form of header mangling, as can be demonstrated by UPX's inability to unpack the file accompanied with a "p_info corrupted" error message.
 Fig. 3) UPX throwing errors and failing to unpack the mangled binary
If we process this known corrupted file through the upx_dec tool, it will produce the .fixed variant of the file where the headers have been repaired as previously described.
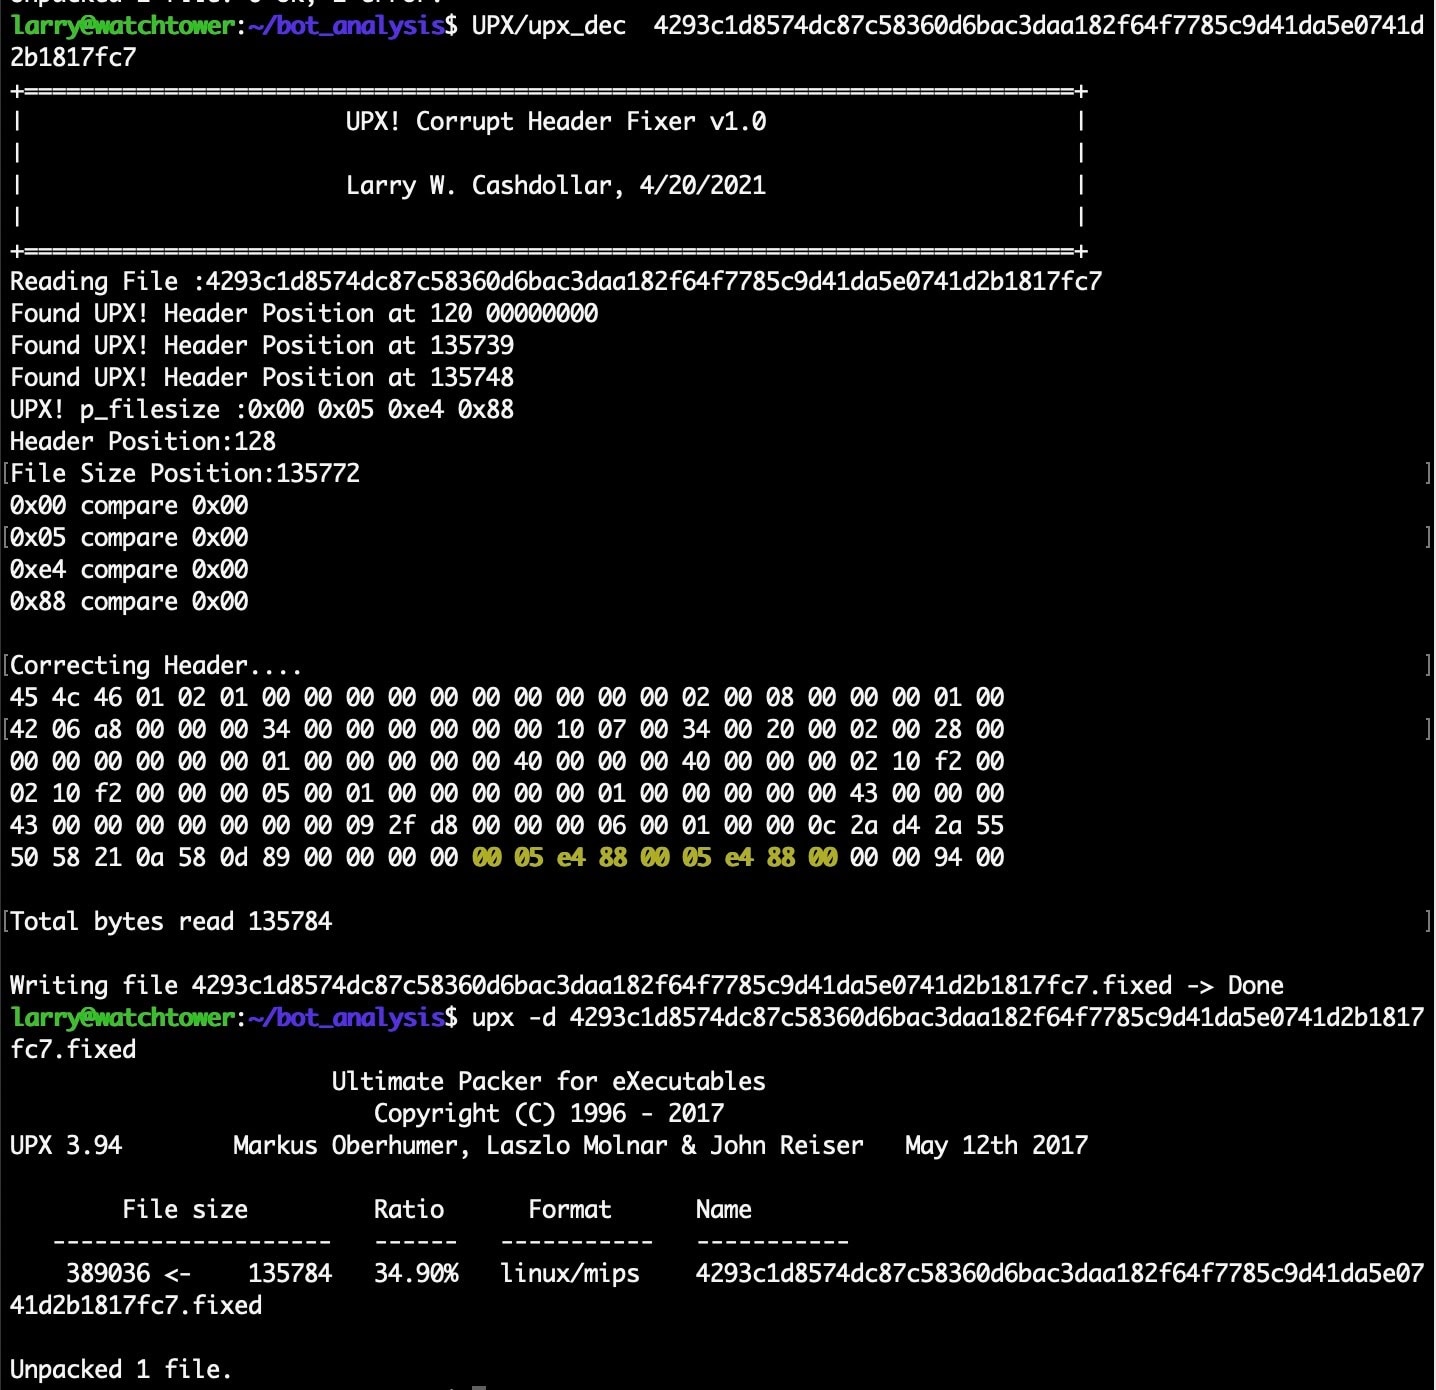 Fig. 4) Running the upx_dec tool, and successfully unpacking the patched binary
When we run the UPX unpacker on this .fixed variant of the file, we can see that the sample will be successfully unpacked without complaint.
The tool is by no means a fix-all solution, and will only handle this particular file corruption technique. However, it will hopefully save some researchers a little manual labor going forward.
A word of warning
All of the following examples and techniques should be done in a virtual machine (VM). We will be detonating the malware as part of our required analysis processes, the host system could (and most likely will) become infected and/or altered by the malicious programs. It's always better to err on the side of safety and limit unintended exposure, which is most easily done by leveraging a VM that can be isolated and thrown away or reverted when we're done.
DO NOT RUN THESE TOOLS ON YOUR HOST MACHINE WITH LIVE MALWARE OR YOU WILL HAVE A BAD TIME.
Dealing with unpackables
At this point, we've focused on a tool for repairing a common type of UPX mangling. There are cases where repair and recovery of the UPX headers may be feasible but likely would be more work than it's worth. Additionally, there are cases where UPX toolchains may have been modified by the malware author, making these samples unpackable by vanilla UPX implementations. In those cases, we can scrape the memory of the binary at runtime and pull out an unpacked variant of the binary for examination.
There are various ways to do this. For this blog, we'll make use of radare2, an open-source reverse engineering toolchain. We'll also leverage r2pipe, which is a Python library that allows interfacing with an instance of r2 programmatically. Lastly, we'll use virtual machines as a "safe" place to examine and work with the malware in the following examples and demos.
UPX and the golden breakpoint
After investigating several UPX packed samples, some self-compiled and others being real-world malware, a common breakpoint was found across x86(32 & 64bit) implementations. The syscall to munmap appears to be called reliably after the UPX unpacker stub has finished completely unpacking its payload. In the following sections, when we discuss breakpoints for dumping and further analysis, the breakpoint we're referring to is the syscall for munmap, which is 0x5b or 91 in 32-bit, and 0xb or 11 in 64-bit binaries. While it isn't perfect, it does serve as a reliable breakpoint to ensure relevant memmaps have been allocated and fully unpacked.
Coredumping mangled variants with r2
Core dumping a UPX binary at the right time will give you visibility into the unpacked malware's inner workings. This solution leaves a lot to be desired, and it isn't super useful unless you can find relevant addresses, such as the original entry point (OEP), or the address of the main function (called from OEP to begin program execution). Generating a core dump in r2 using the dg command couldn't be easier, and while not the prettiest or best means of taking a peak around, it will still provide more visibility and static analysis possibility than its packed counter-part.
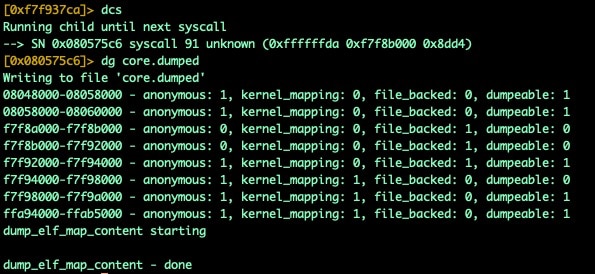 Fig. 5) Breaking and generating a core dump
While this process is very easy, it leaves a lot to be desired. When loading the core dump into analysis tools, you'll be left at the execution point where the binary was when the core dump was created. As we know in our case, that is when the munmap syscall occurred, it can be difficult to actually get your bearings in an unfamiliar binary. To ease this process, we need to identify our OEP, then track down the address for our main function where we can start to dive deeper into the application.
UPX, OEP, and finding main
How to find the addresses for OEP and main in UPX packed ELF binaries is a subject that a lot of previous researchers have sort of glossed over in their write-ups. So let's discuss some simple techniques for finding OEP and main in UPX packed ELF binaries.
After a bit of reverse engineering and tinkering, we learned a couple of important lessons about how to track down these very valuable reference points during UPX detonation. UPX, at run-time, sometimes patches its own ELF headers in memory, other times it allocates new memory segments (this varies by architecture, but also seemingly by the UPX version used).
In cases where the ELF headers are modified at run-time, finding OEP is actually very simple. To identify OEP we simply dump 8 bytes from <base>+0x18 (ELF header entry value) after we've hit our munmap breakpoint. Below is a before and after example to demonstrate how this value can be found and extracted.
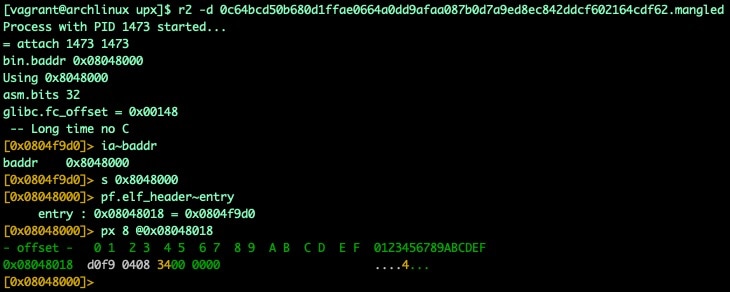 Fig. 6) ELF header entry point before unpacking
 Fig. 7) ELF header entry point after unpacking
With the OEP identified we can load up our core dump and seek to that address. We should be looking at the entry0 function of the unpacked binary.
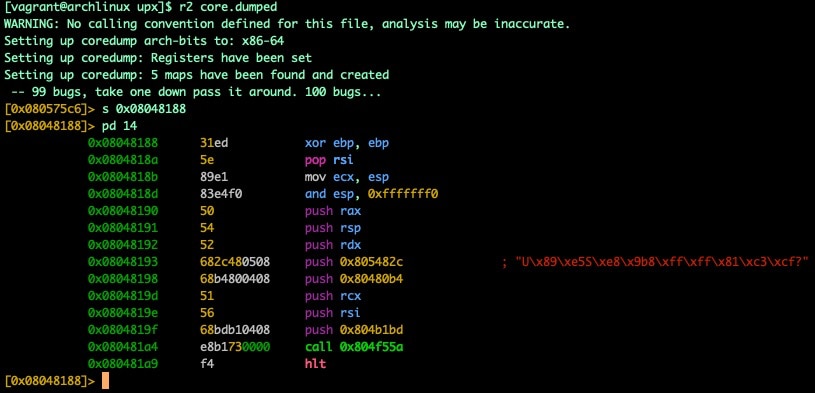 Fig. 8) OEP/entry0 found in core dump
In this screenshot, you also can find the address of main by looking at the instructions of entry0. In Figure 8, the instruction at 0x0804819f (push 0x804b1bd) actually tells us where the address of our main function is located (0x804b1bd).
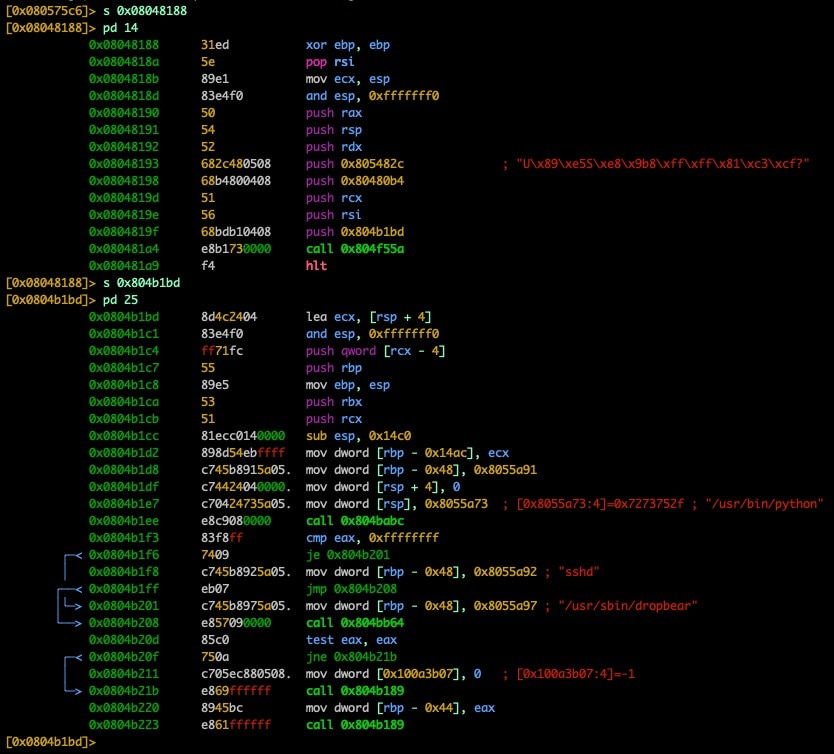 Fig. 9) Finding and showing main
As we can see, with these values in hand, our core dump becomes much more valuable as we can start to trace down various function calls and interesting observations immediately without hunting around too much. After analysis (aaa), we can also use some of those great r2 features like function/call graphing, xrefs, etc.
The above example used a 32-bit binary with self-modifying headers, the process of finding OEP and main in 64-bit architectures (typically without self-modifying ELF headers!) varies only slightly. We'll resume from our munmap breakpoint, but we'll need to do a bit more work to find where our newly written ELF headers are since we know that self-modification isn't happening. Luckily there is a telltale sign we can look for, our ELF magic bytes in a segment without accompanying UPX! Headers.
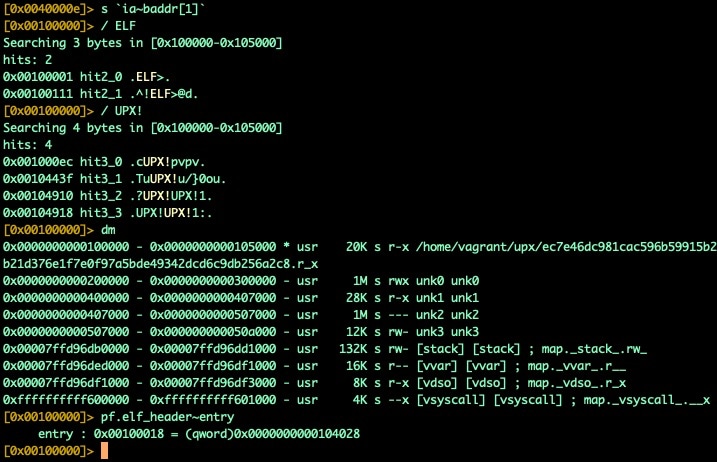 Fig. 10) ELF and UPX headers found in UPX segment
We can see that the segment we're in (0x100000-0x105000) contains ELF headers, but the entry point hasn't changed (not shown in the screenshot). The other telltale sign is the presence of UPX! headers in the segment, even though our memory should already be unpacked. If we look a little further down, we'll see additional segments that we'll need to inspect.
 Fig. 11) Finding OEP in unpacked segments
We can see in segment 0x400000 that we identify our ELF magic bytes right at the start of this segment, and we also confirm no UPX! headers exist; this is our real ELF header for the unpacked binary. We can use pf.elf_header~entry to get our OEP.
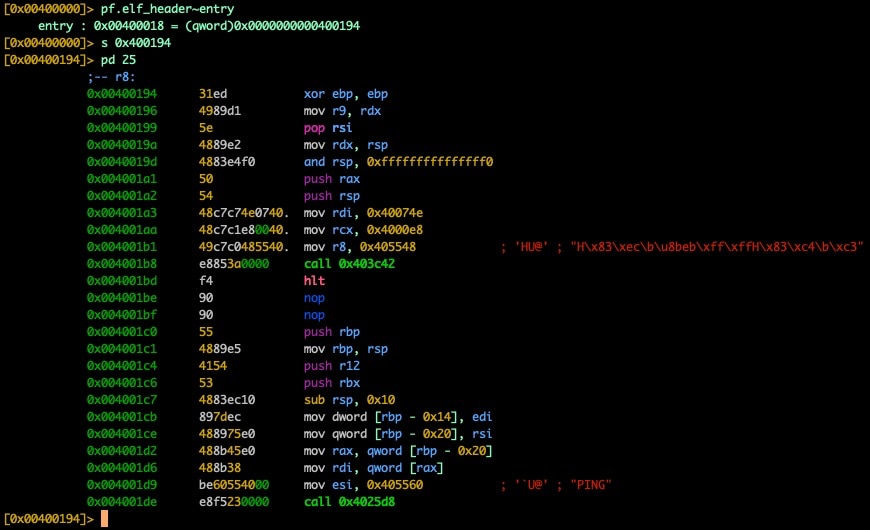 Fig. 12) Inspecting unpacked entry0 @ OEP
In the 32-bit sample, we saw our address for main pushed onto the stack, but due to differences in calling conventions for 64-bit architectures we'll need to look elsewhere; luckily it isn't hard to find if you know what to look for. At the address 0x4001a3 we see the instruction mov rdi, 0x40074e and this is our address for main (0x40074e).
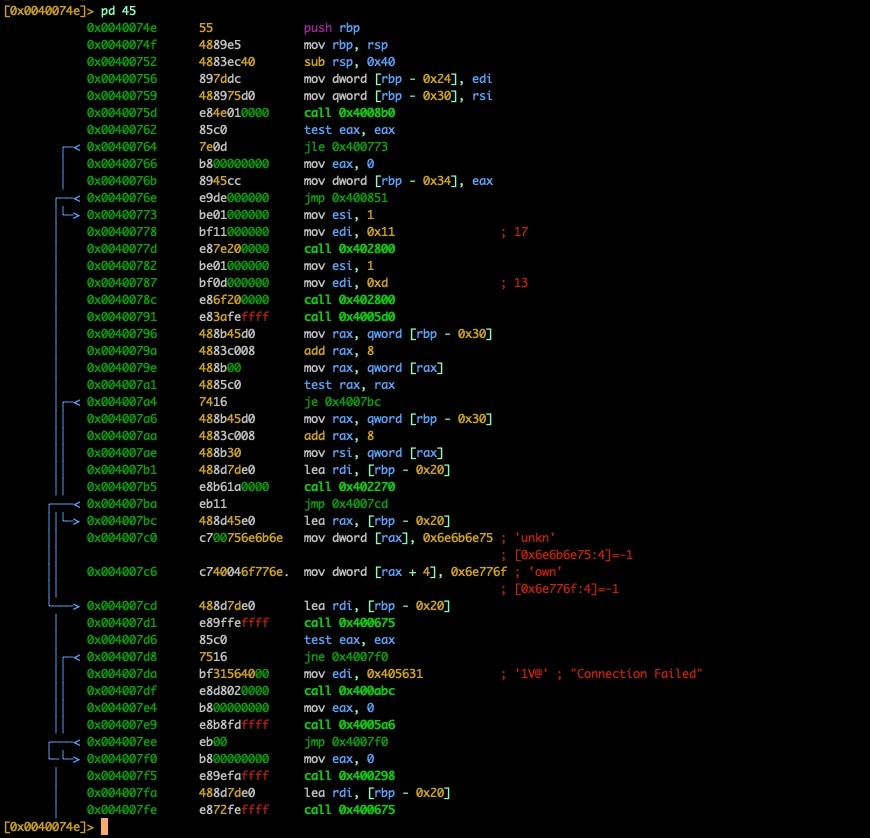 Fig. 13) disassembly of main found via pivot on OEP
While core dumping is useful for static, and possibly dynamic analysis, it's still rather messy and clunky. Luckily there are ways we can extract the unpacked binary without being in the context of a core dump for analysis too.
Manually dumping mangled variants with r2
First, we'll need to load the binary into radare2 with debugging enabled. Once loaded, we can inspect the memmap that was set up for execution.
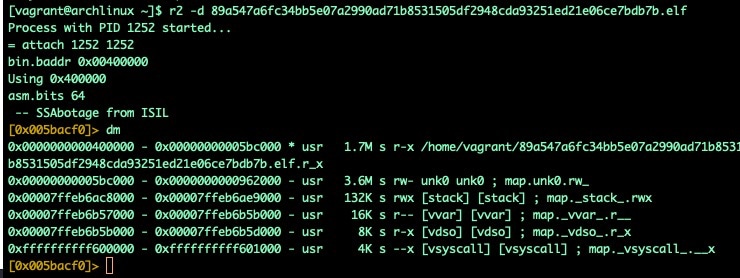 Fig. 14): A memory map showing the current allocation
As we step through this sample, we can see more memory segments being set up in preparation to unpack our malware.
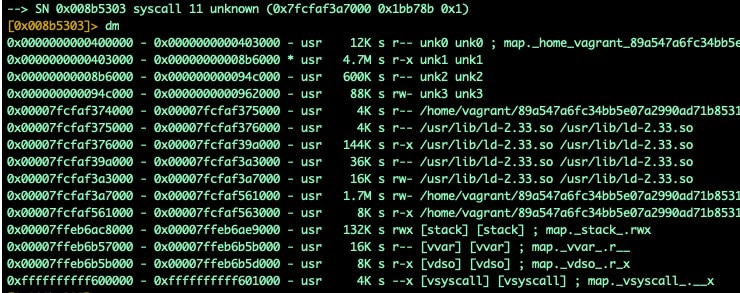 Fig. 15) Memory allocations are being set up for the unpacking process
We see that the memory space contains a 5.4MB area that the unpacked binary is stored in. Memory area 0x400000-0x962000 contains our unpacked binary. As the unpacker runs, it will modify this 5.4MB area to prepare the unpacked binary for execution. If we break on the munmap syscall, we've found that we can reliably extract the unpacked executable from this freshly modified memory.
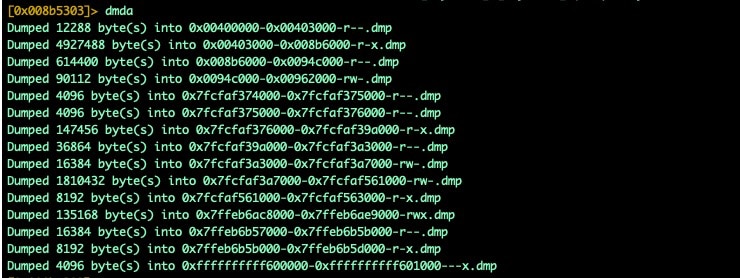 Fig. 16) R2 showing section headers dumping
Dumping the memory with the dmda command will give us the parts we need to reconstruct an unpacked executable. These segments dumped to disk can now be concatenated together and result in an (sometimes malformed) ELF executable. Even if it can't be executed without crashing, it can be loaded up for static analysis purposes.
 Fig. 17) Rebuilding executable from dumped memory segments
It's important to note here that some implementations include additional segments that will break otherwise functional binaries. Avoid including segments into your reconstructed binary that had no permissions at runtime. In Figure 17 (above), all of our segments have either read, write, or executable permissions when mapped in memory, only use segments with at least one of these permissions set.
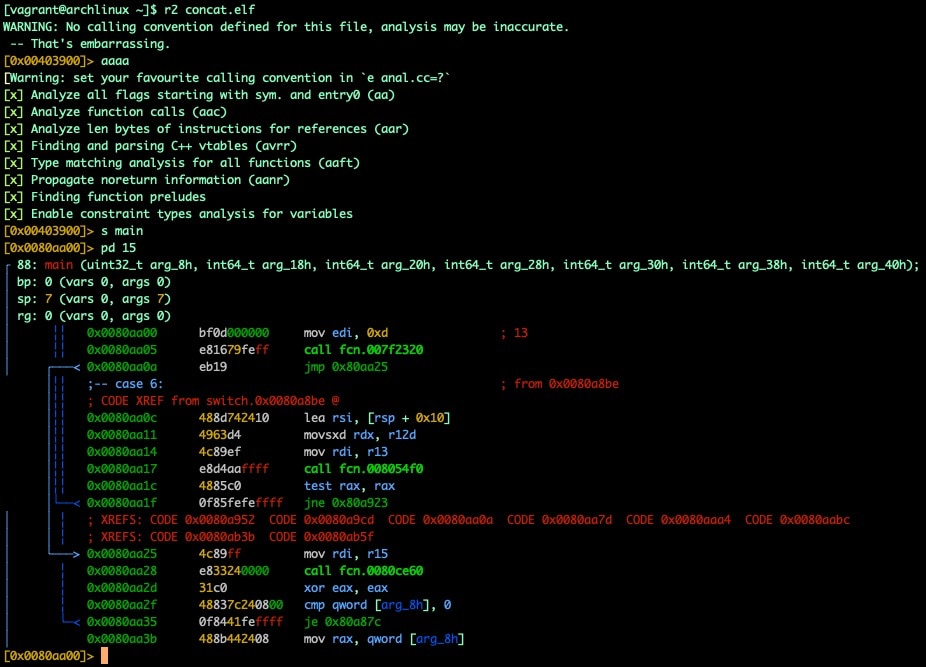 Fig. 18) R2 analysis of rebuilt executable
Introducing oepfinder.py
Using r2pipe and lessons learned during this research, the Akamai SIRT team built a simple tool, oepfinder.py. This tool automates the core dumping process outlined above and takes additional steps to automate the identification of OEP and main addresses (in most cases!).
 Fig. 19) using oepfinder.py to find OEP and main
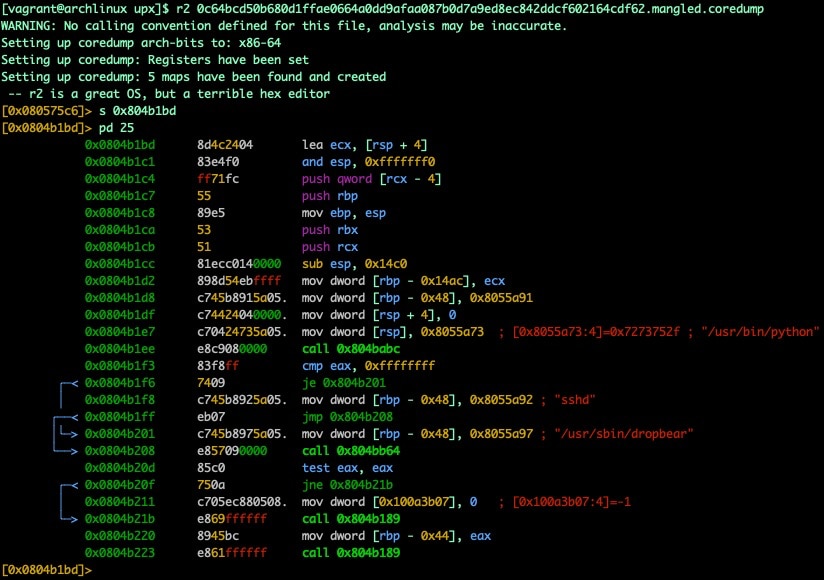 Fig. 20) using main address found using oepfinder.py
Introducing upxdump.py
While core dumps with guidance are a great resource, the real goal is to extract a fully functional unpacked version of the original binary. This will allow a researcher to engage in both static and dynamic analysis workflows using a shared point of reference. While the upxdump.py tool isn't 100% effective in producing a functional binary in all cases in our testing, it does produce better results in most cases than core dump analysis. Additionally, even if the resulting binary SegFaults from alignment issues, the resulting dumped binary has additional patches that make it play nice with most tools and is easier to analyze in our testing. In the following example, we'll take the same mangled binary used above, and extract an unpacked and executable dump.
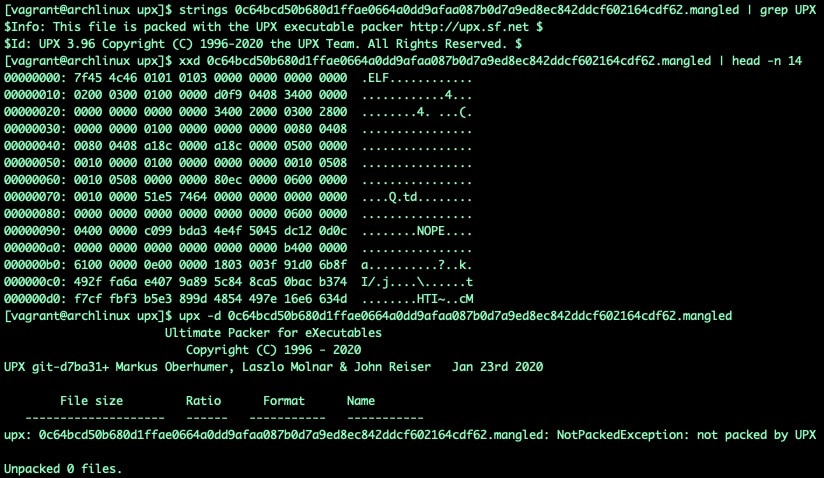 Fig. 21) UPX but mangled
In Figure 21, we can see that based on string leakage the binary has been packed with UPX version 3.96, but the p_info headers have been mangled, additionally the UPX! bytes have also been overwritten. In this case, it's obvious that UPX! has been replaced with NOPE, but it's unlikely that the real world malware samples you may encounter will be this obvious. Rather than repair these mangled headers, for the sake of example, we'll show unpacked binary extraction via the upxdump.py tool.
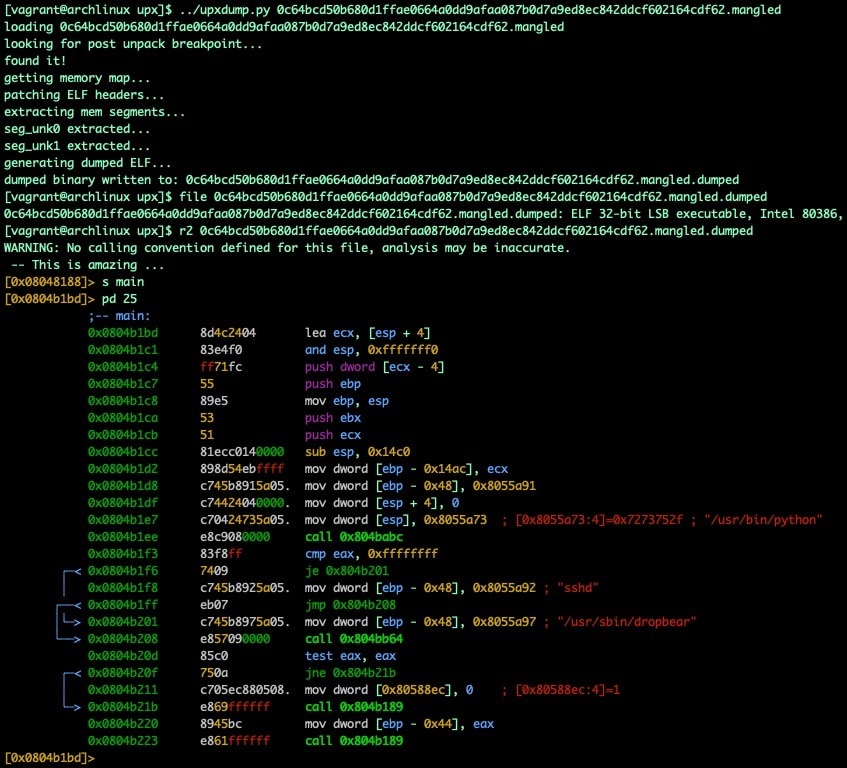 Fig. 22) upxdump.py dumping unpacked binary
In this case, the resulting binary isn't just unpacked for analysis, it is also functional and can be used for controlled detonation and dynamic analysis.
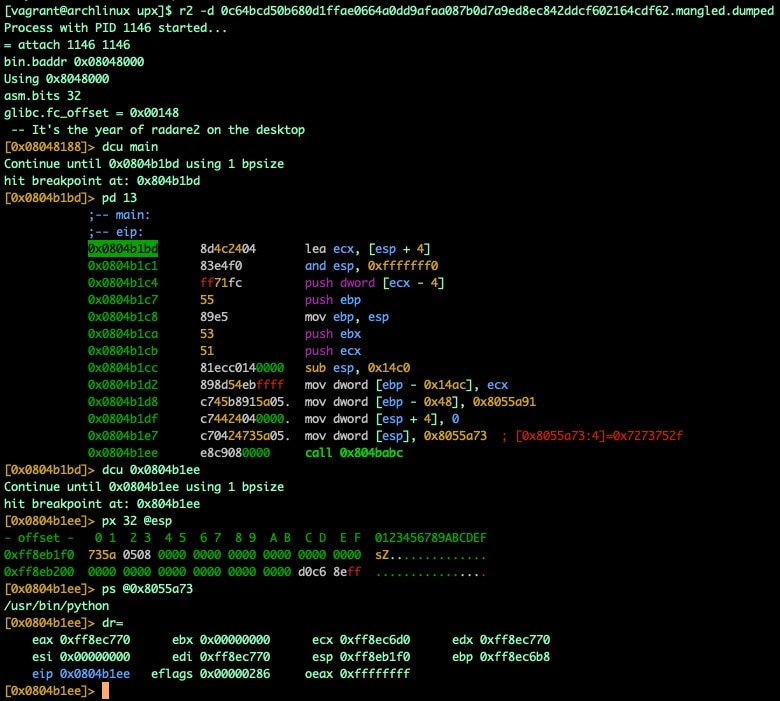 Fig. 23) Using dumped unpacked binary for dynamic analysis
At first glance, the upxdump.py script appears to do the same processes outlined in the manual dumping section. However it also takes some small additional steps to make things more likely to result in a successful and useful dump. Some of these steps include the automated omission of identified packed segments, the skipping of segments without proper permissions, and the patching of ELF section headers. That said, we find another imperfect tool with varying measures of success. While the tool will successfully extract a binary in all of our testings, the chances of that binary being executable are a toss-up, so don't be afraid to figure out how the tool works and potentially modify it to fit your needs based on your own discoveries on a case by case basis.
Try it out for yourself
All of the tools mentioned in this blog have been open-sourced and are now available on GitHub if you'd like to check them out, use them in your own toolchains, or explore the techniques and implementations used. Feel free to fork and submit pull requests for discoveries, improvements, or new features you'd like to see added, we'd love to see what you come up with.
Conclusion
Malware authors will continue to develop new techniques and methods to thwart the efforts of security researchers. Luckily, we have amazing open-source tools to assist us in diagnosing new malware variants and threats. The Akamai SIRT team feels that, as researchers, it's important to truly appreciate the amazing work of the researchers who came before us and to help those that will come afterwards. Just as previous researchers have shared their discoveries, knowledge, and tools, we hope to do the same and give back to the community that we draw so much knowledge and inspiration from. We hope you'll find the lessons learned here and the tools provided at least interesting, but hopefully also useful.


