Deploying HarperDB and Akamai Connected Cloud for Faster API Performance
APIs have become an integral part of our daily lives as the growth of internet-connected applications continues. User expectations require us to deliver seamless, fast, and reliable experiences. As a developer, my ultimate goal is to deliver on that expectation to my users. I was excited when I discovered Akamai API Acceleration, as that solution optimizes delivery performance for API traffic, making it easier to deliver on high user expectations.
To put it to the test, I leveraged the Akamai Connected Cloud to strategically host HarperDBTM nodes in various regions worldwide. I then clustered them together in HarperDB Studio to create data replication between Instances for optimal global performance. This architecture mimics what would be needed for global traffic from a highly distributed global application.
Utilizing HarperDB with Akamai API Acceleration helps to confidently deliver lightning-fast response times to a global population, providing an unparalleled user experience.
What is HarperDB?
HarperDB is my developer Swiss Army knife — it is a SQL/NoSQL database that offers incredible speed and flexibility, with a dynamic schema that can adapt to changing needs on the fly. I can choose to run it at the edge for optimal client performance, or in HarperDB’s public cloud. Its robust feature set includes clustering and a unique Custom Functions feature: both of which make HarperDB a dream tool for any full-stack developer.
Harper DB’s Custom Functions
HarperDB’s Custom Functions allow me to host API endpoints as part of our HarperDB installation, removing the need for any additional servers to host a full-stack solution. I can also host our front end using Custom Functions, making HarperDB a one-stop shop for my entire application stack; I prefer this practice as it lowers the complexity of my setup while still handling global requests at blistering speed — truly a win-win.
Akamai API Acceleration
API Acceleration optimizes the reliability, speed, and security of deployed APIs that are delivering content in JSON, XML, or GraphQL. It uses Akamai’s expansive global CDN infrastructure to deliver — and, most important, cache — APIs in the most efficient way possible, providing users with the least latency possible.
StackScripts
StackScripts are configurable scripts that run as soon as the hosted server is launched for configuration, to install packages, and much more. I can write them on my own, or use one from the Community StackScripts marketplace. HarperDB provides a robust StackScript to fully configure my Instance as soon as it launches.
Implementation and configuration
From the Akamai Connected Cloud dashboard, select StackScripts on the left sidebar and click Create StackScript, which will help automate the deployment of HarperDB.
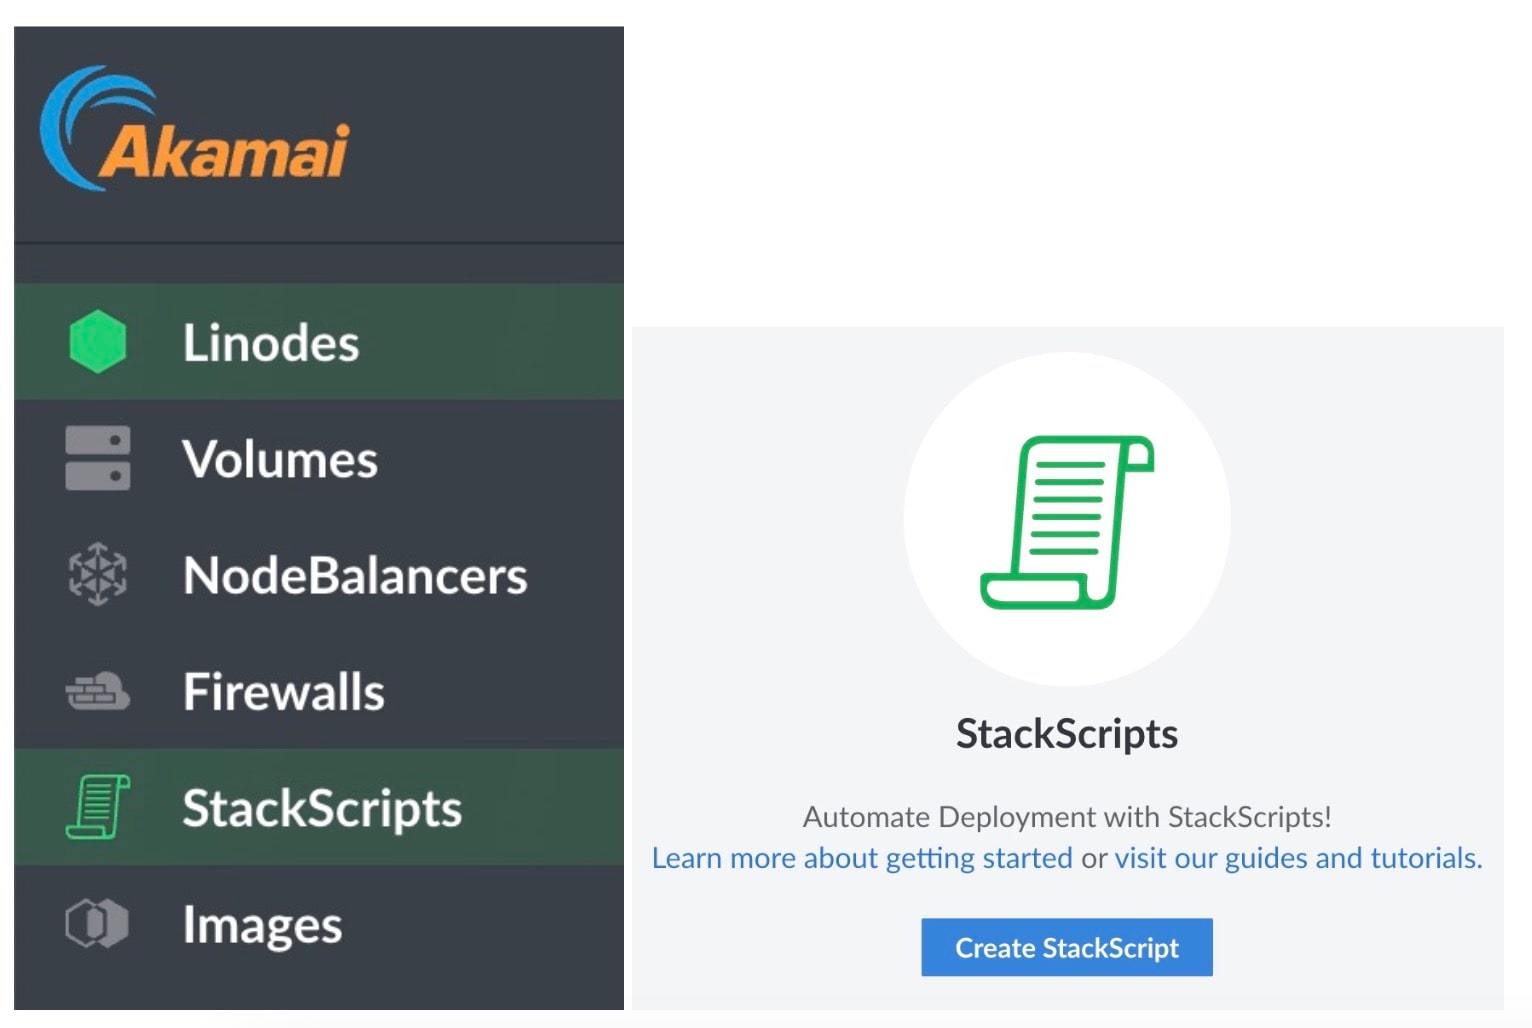
Name it HarperDB with a helpful description for your project. Next, select Ubuntu 22.04 as the operating system required by this particular StackScript from HarperDB. Then, paste in the StackScript HarperDB provides and save it.
Launching the StackScript
With the StackScript now created, launch the instance by clicking the three dots on the right side of the StackScript row and selecting Deploy New Node. This will bring up the Node creation screen and provide all of the HarperDB configuration values at the top. The StackScript you pasted in comes with good defaults for everything. Be sure to populate the passwords and save them to a password manager.
With all of the HarperDB options configured, the last step is to configure the Instance details such as the root password and instance plan (specs of the compute instance). To get started, select a region near you and a plan that fits the scale of your project. You’ll cluster together a few Instances in other regions later as you scale out our test. (Any of the instance types work for HarperDB, even the small shared 1 GB plan, which is the one I chose for this test.)
After clicking Create Node, provisioning the Instance will take a few minutes … and then it’ll take a few extra minutes for your StackScript to finish running. Check if the Instance is online by grabbing the IP from the Instance’s detail page and making a request to the HarperDB API:

Since you aren’t making a valid request to the API here, you’ll get a Not Found error. This tells you that the server is up and running, and this response is expected since you’d have to submit a POST request with an operation and your authentication details to create a valid request.
Adding a reverse proxy
API Acceleration works with traffic on ports 80/443. To support this, set up nginx as a reverse proxy on each Instance. Specifically, point it to the Custom Functions port and a project of your choosing (api in this case).
To connect to the instance, use the SSH Access string from the instance detail page and then connect using your SSH key or root password:

Once connected, you’ll want to install nginx and then load a custom configuration enabling SSL and the reverse proxy. The commands to do this are shown below. (NOTE: If you want to use a project name other than api for your setup, you’ll need to modify the default configuration file and change the path for the proxy_pass setting.)
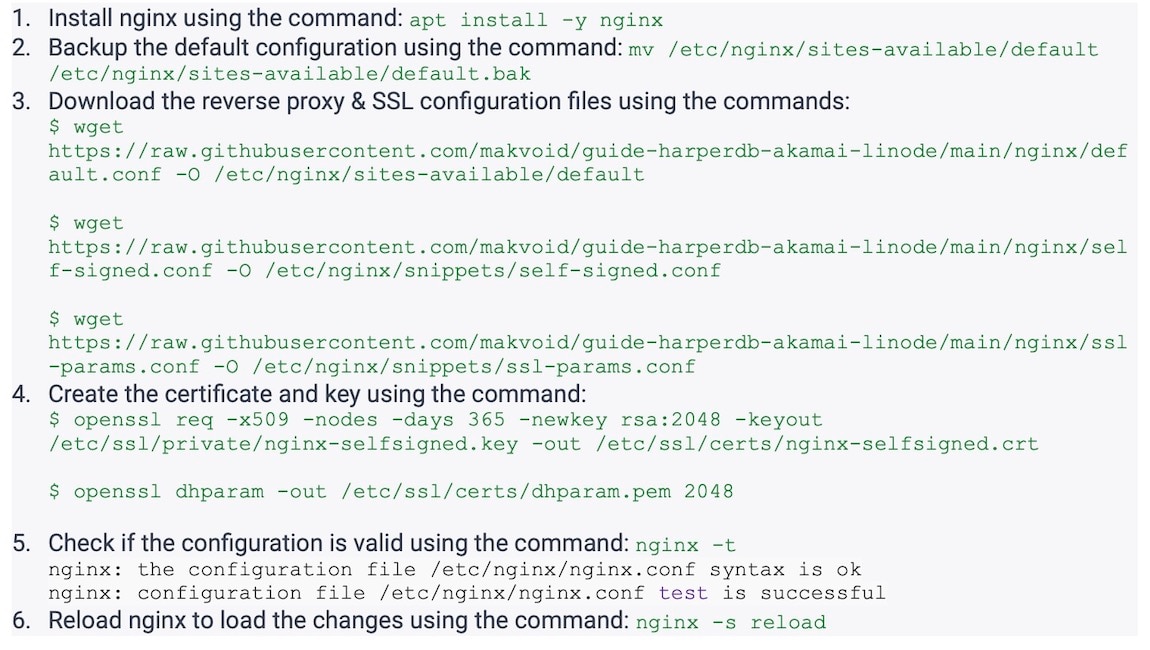
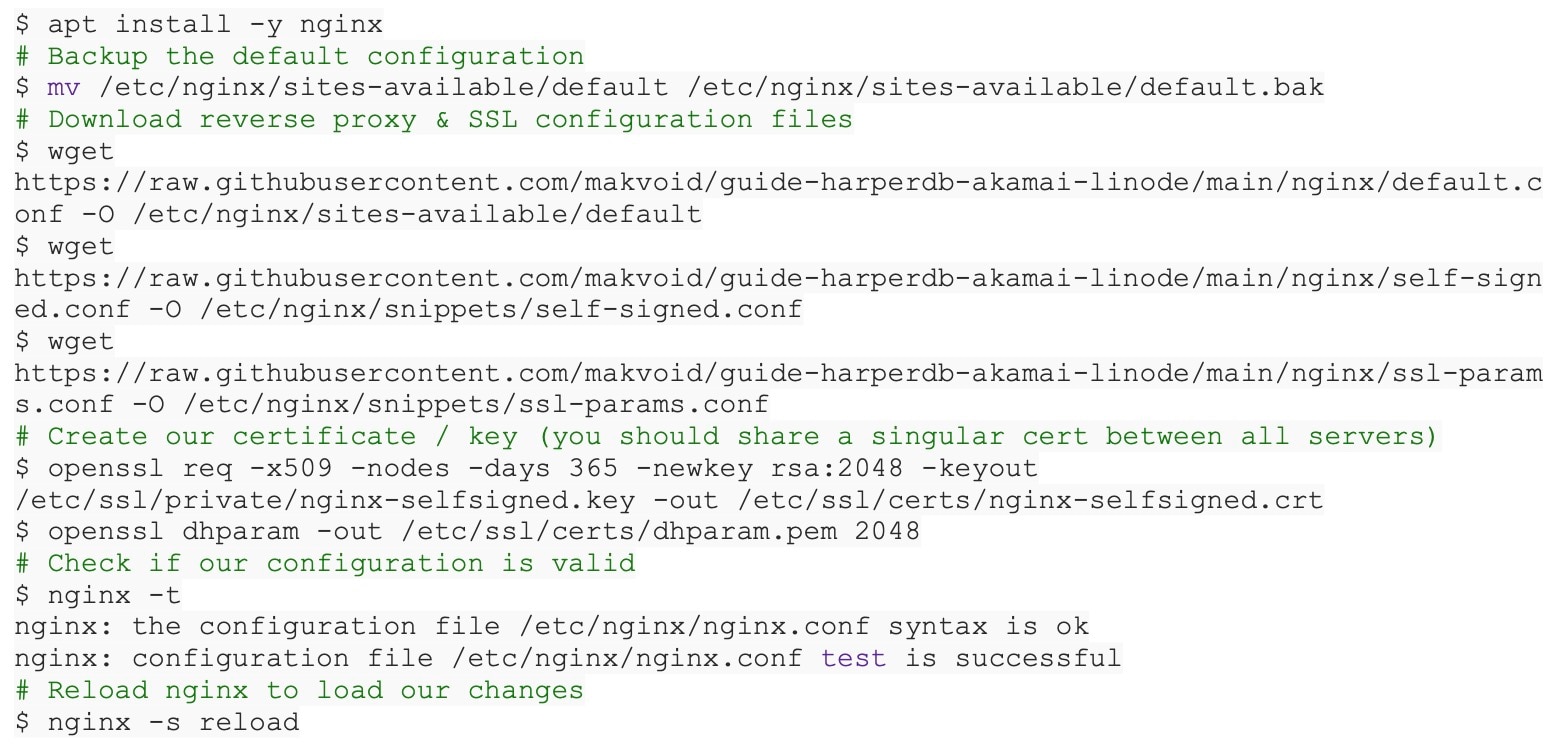
After completing these steps and restarting nginx, you should now be able to submit a request to the IP address and get a response after accepting the newly created self-signed certificate. Since you have not set up any Custom Functions yet, you should see a Not Found error (which is expected and okay).
The year 2022 was marked by significant changes in many areas of cybersecurity. Amid the turmoil, there was a noticeable shift in distributed denial-of-service (DDoS) attacks targeting and adversarial behavior. Perhaps the most significant lesson learned from last year is that DDoS attackers are targeting everything online, sometimes all at once.
Two prominent themes emerged in 2022 — the rise of horizontal DDoS attacks and the increased targeting of customer assets that were previously deemed unattractive targets to adversaries — but we do not believe that the industry provides sufficient end-to-end analyses of DDoS attack techniques, tactics, and procedures (TTPs).

Alternatively, you can use Let’s Encrypt and have certbot automatically manage the certificate.
Extra regions
To support a global user base, you’ll want to repeat the previous steps and launch additional Nodes in other geographies, such as the United Kingdom and Japan. You can use the same settings and scripts, and grab their information later in the guide when you set up the DNS.
As you add additional Instances, keep in mind the need for TLS certificates. API Acceleration is configured to validate the Instance-hosted certificate, so if you have multiple certificates on different Instances, you’ll need to add them to your API Acceleration config or you could clone your Instance and leverage the same certificate.
Setting up DNS
Before you can set up Akamai API Acceleration, you’ll first need to set up a DNS record that takes the request’s geographic location into account so Akamai can serve any cache misses from the server closest to the end user, ensuring the latency is as low as possible. Akamai Global Traffic Management DNS service can handle this for you but, first, you need to set up a few DNS records for each zone you want to serve.
To best support the use case for a global user base, you can divide the world into three zones: one for the Americas, one for Africa/Europe, and one for the Asia and Oceania regions. In your domain registrar, you’ll need to set up three A records for each zone and point them at the Nodes you previously created.
For example, I used the Akamai Connected Cloud to manage my domain’s DNS. Here’s how I set it up:

Now that you have your DNS records, you can set up the Akamai Global Traffic Management domain. In the search box at the top of the Control Center, type “DNS” to find the Global Traffic Management page and click Add New Domain.
For the domain name, enter your root domain name (which, in this case, is testbasic.xyz). The next step is to set up a data center for each zone you use (which, in this case, are Dallas, London, and Tokyo). You can find detailed steps on this Akamai TechDocs page.
Once you’ve added the new domain, switch over to the Geographic Maps tab and click Add New Geographic Map. Name your map Traffic Map 1. For the first zone, set up the Americas and name the zone Americas Zone. You’ll want to select the two checkboxes next to North America, South America, and Others, and then click Add next to the zone.
Next, click Add New Zone and name it Europe Zone. You can then select Africa, and Europe and click Add to set up the zone. Add one more zone and name it Asia Zone. After selecting Asia and Oceania, you can click Add and that will be all of the zones you need. Finally, you can click Add to Change List.
To finish things up, switch back over to Properties and click Add New Property. For the property name, you can use prod-api and select the Map by geographic location option.
The next page will ask you for your handout CNAMEs for each zone, which is where the requests for each zone will end up. Enter the correct DNS record for each zone and then choose the United Kingdom zone for the fallback mapping since it should be more centrally located on average.
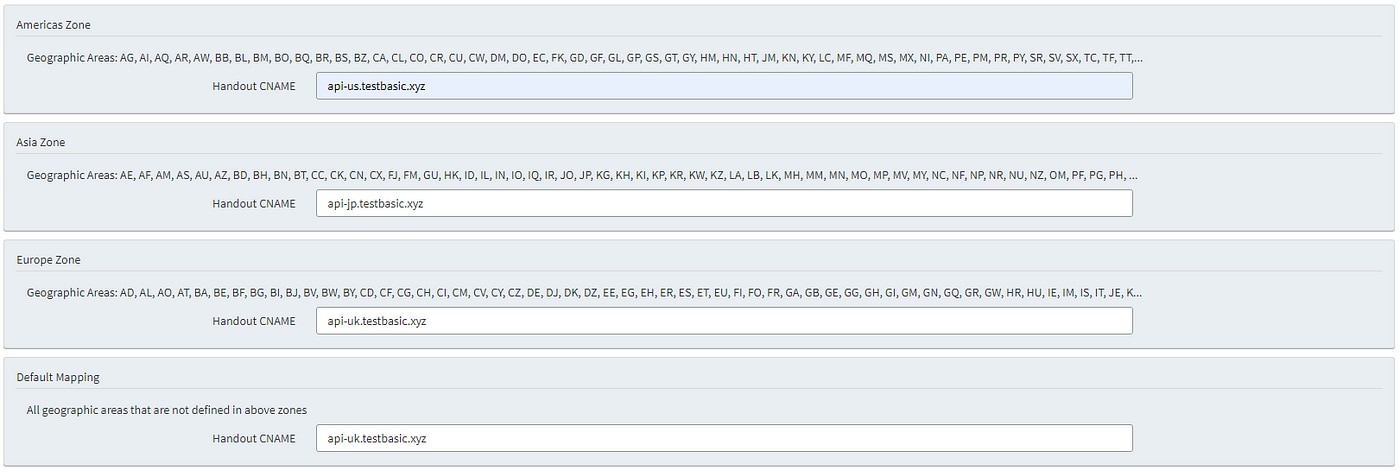
After clicking Add to Change List, click Review Change List, and then activate the domain. Now that the domain is activated, you can set up your accelerator and point it to this traffic management record.
Creating your API Acceleration
To get started, you can head to the Akamai Control Center and create a new property. We can select Create Property under API Acceleration to continue. First, it will first want to know the property name, for which I recommend using the domain name/FQDN. For example, you can enter api.testbasic.xyz if that is the endpoint you’d like to serve using API Acceleration.
The next step is to set up the hostname and point it to the correct endpoint. Under Property Hostnames, click on the Hostnames drop-down menu, and select Add Hostname(s). You’ll then need to enter the hostname of the property you want to serve, which is api.testbasic.xyz in this case. On the next page, click the pencil icon next to Edge Hostname.
Here, you’ll want to enter your property hostname on the left side and select edgesuite.net from the drop-down menu on the right. You can then click Update and click Submit to proceed.
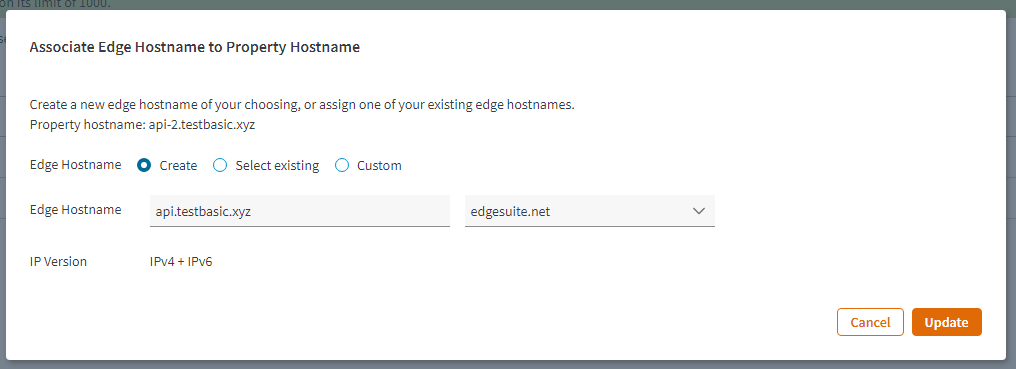
You then also need to add a CNAME record to your DNS so that this endpoint is properly redirected to Akamai’s server. Back in the DNS manager, set up a CNAME record for api.testbasic.xyz and point it to api.testbasic.xyz.edgesuite.net. This way, any requests to your API endpoint will be routed through Akamai’s servers and, ultimately, to your specific instance for each zone if you encounter a cache miss.

Once you have added your DNS record, you need to add a Behavior to your default ruleset so that you can use all the request methods with your API — otherwise only GET would work. Under Behaviors, select + Behavior. Select Allow All Methods on Parent Servers and click Insert Behavior. You can then disable nonrequired methods like PATCH at the bottom of the behavior list if desired.

Under the Origin Server section in Behaviors, you can set the Origin Server Hostname to the Global Traffic Management endpoint you set up previously. In this case, it would be prod-api.testbasic.xyz.akadns.net. For Origin SSL Certificate Verification, set the Verification Settings to Choose Your Own. Select Specific Certificates (pinning), and click Add Certificate. Ensure that Retrieve from Origin is selected, and enter your hostname and select Add Certificate(s).
If you opted to use Let’s Encrypt instead of a self-signed certificate, you’ll want to make sure that the Certificate Authority is pinned instead of a singular certificate.
Under Content Provider Code, you can create or select a previously created CP code for your endpoint (which does need to be unique). Finally, on the left side, click Performance. Set the SureRoute Test Object to /sure-route-test-object . You’ll set up a custom route in Custom Functions to serve the test file so that Akamai can determine an optimal path and establish the best second option if one fails.
With this finished, you can click Save to save your property.
Creating a new certificate
One last thing you’ll need to do before pushing your new property to production is to create a SSL certificate. In the search box at the top, type in Certificate and select ‘Certificates. Click Create New Certificate and proceed with a Domain Validation (DV) certificate with a SAN type. It’ll then ask you for some company and contact information, which you should fill out as needed.
Once the certificate is created, it’ll ask you to validate the domain, which can be done through DNS. For the quickest approval, you’ll just need to add a TXT record to your DNS records. Afterward, you just have to wait for Akamai to deploy the certificate, which only takes a few minutes.
Pushing to live
Once your certificate is created and deployed, you can head back to your property by searching for Properties, clicking the one previously created, and selecting the latest version. In the top left corner, click Activate, which will prompt the options of staging and production.
If this isn’t a live endpoint yet, you can just proceed with production. Otherwise, you’ll want to follow the staging directions to ensure everything is working as intended before activating it on production. To deploy to staging and test, follow this guide.
Once you have deployed the changes to production, you should then be able to cURL the API endpoint you created earlier and get a response:

Since you haven’t added a Custom Function yet, this Not Found error is expected, but it means all your settings are working as intended! Now, you can finally fix this error and add a Custom Function!
Testing
As proof of concept, you can use the API Cache Custom Function package released by HarperDB. This will cache any outgoing requests into the database, and then when another matching request comes in, you can serve that information from the database in milliseconds versus having to fetch it manually. You’ll also cluster together the HarperDB nodes so that they automatically share the information available among all nodes, reducing the global latency.
To get started, you’ll need to SSH into your Instance and clone the repository. You can grab the SSH Access string from the Akamai Connected Cloud instance detail page and then connect to your Instance:

With the repository cloned, you now need to restart Custom Functions to load your new project. You can head over to HarperDB Studio to set up this Instance, which will allow us to easily manage our Instance from your browser. (I covered signing up in depth in a previous article, which you can review if you are new to HarperDB.)
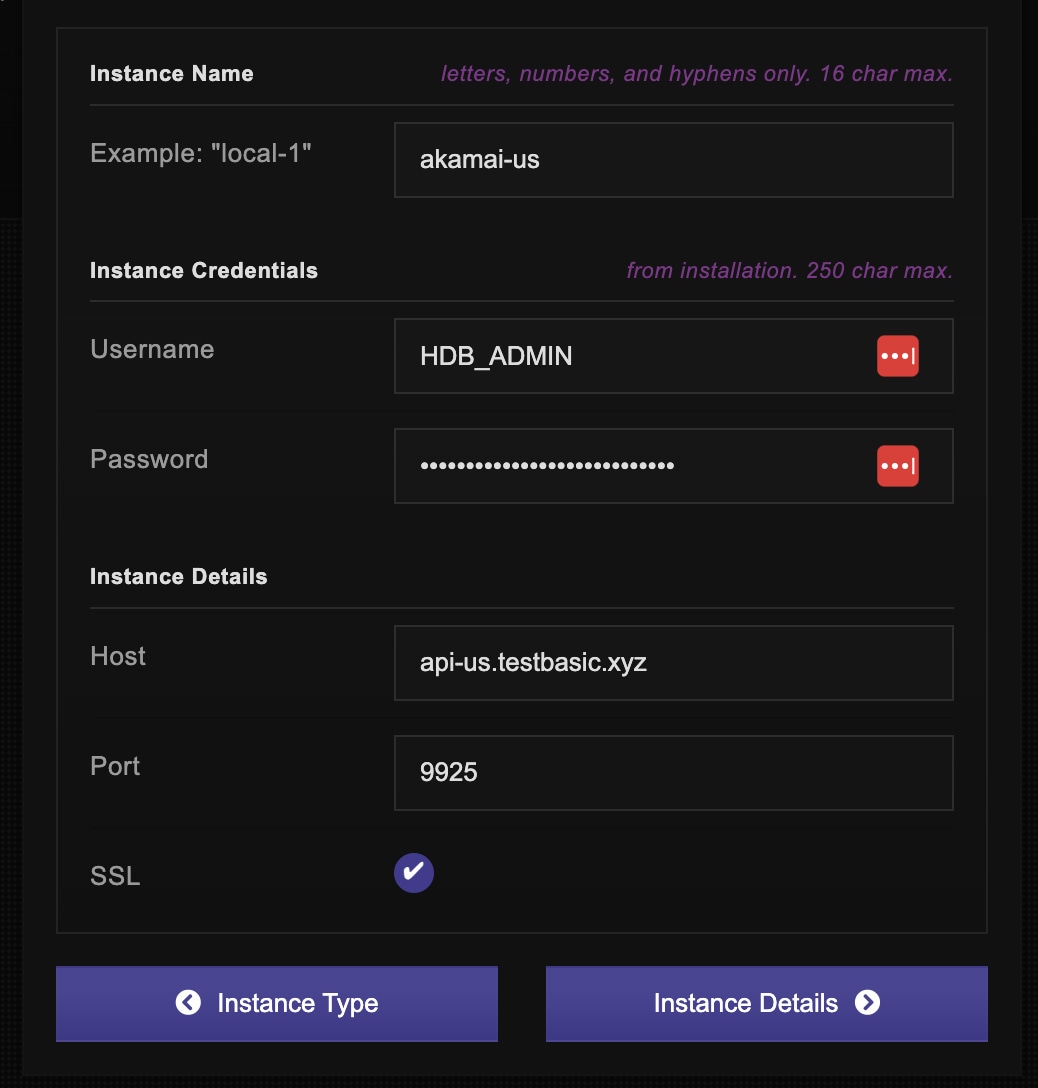
After adding the details for your Instance, proceed with the free tier of HarperDB and complete adding it to your HarperDB account. Then, click on the newly created Instance and select Functions. At the bottom left, you’ll see a restart button. Click it to reload the functions.
The Custom Function will load and you can test it like this:

This will result in a response with a random dog video. If you submit the request again within five minutes, you will get the same video thanks to the caching custom function. I saw a latency decrease of 1.5 seconds per request when using this sample API as an example, but ultimately this depends on the latency of the remote API as well.
The cache time of five minutes is customizable inside the configuration for the Custom Function. To change it, you can open HarperDB Studio and edit the config file under the Helpers section and modify the MAX_AGE_SECONDS setting.
Going global with clustering
To create a more thorough test, you can test this from all over the globe and utilize Akamai’s geographic routing. Go ahead and add the other two Instances you launched earlier to the HarperDB Studio account:

With all three Instances ready, click the original Instance in HarperDB Studio and select Cluster. On the left side, you should see your other two Instances under Unconnected Instances. You can click the + next to each of them to connect these Instances together. You’ll then want to enable “publish” and “subscribe” for the request_cache table — this way HarperDB will automatically sync the data between Instances both ways.

Once clustered together, HarperDB makes it easy by allowing you to copy your API Cache project from one Instance to another. This way you don’t have to connect to each of them, clone the repository, restart the Custom Functions, and so forth — HarperDB will take care of it all!
To do this, once again head over to the Functions tab and ensure you have your API Cache project selected on the left side. You can then click Deploy in the top right corner. From here, you can select each Instance to which you would like to deploy the project. Go ahead and deploy it to both of these Instances since you’ll need the function everywhere to do a proper test.

Now that you have everything set up, the only thing left is to put it to the test! Since you are using the API Cache project, you’ll need to submit one request to the API to cache the data for the first time. I use Ergast’s F1 Driver dataset as I am a fan of F1, but any JSON response will work. Since you’ve clustered all the Instances together, this data will be automatically cached to all your Instances, lowering your global latency greatly.
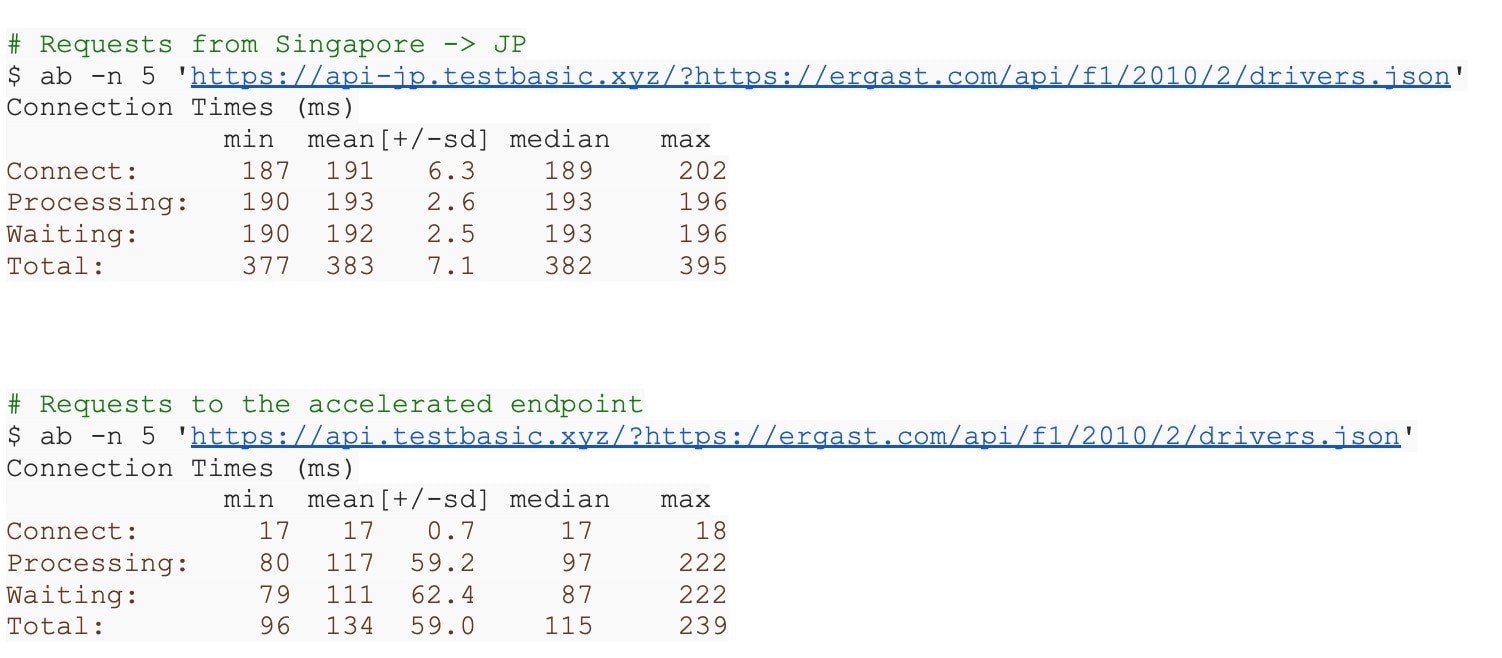
For example, I used Apache Bench to run a set of five requests to both the accelerated endpoint and our raw endpoints to measure the difference in latency:
First, I tested directly to the endpoint to measure the latency without Akamai:

Second, I tested the accelerated endpoint with Akamai:

The times above are in milliseconds (I was impressed by the difference). By inserting Akamai API Acceleration to front our HarperDB cluster, I saw a 40% decrease in latency! The performance increases were even greater when I ran this test globally. In that case, I saw latency decreases as great as 65%.
Conclusion
Pairing Akamai and HarperDB technologies proved to be an incredible solution for achieving the lowest API latency. With the Akamai API Acceleration helping cache requests, we lowered the stress on our infrastructure, which saves operational costs. We also now have the flexibility to implement other services by Akamai, such as using load balancing for a more highly available setup.
It was especially quick and easy to get started with the entire stack, which empowers developers to build the best applications as quickly as possible. HarperDB also really shined since it took care of a lot of the tough work, like clustering and deploying our project from Instance to Instance, which provided more time for code by focusing less on infrastructure.
Get started
To get started, sign up for a free trial of HarperDB. You can also check out more sample projects from HarperDB. They offer best practices and can save you a lot of development time.
Learn more
Want to learn more about the Akamai Connected Cloud? Check out Yair Greenbaum from Akamai on the SELECT* podcast to learn more about Akamai’s partnership with HarperDB.
Resources
API Cache Custom Functions template (with Sure Route test route)
Akamai’s Cloud Computing Services


