
Exploring a VPN Appliance: A Researcher’s Journey


- Akamai researcher Ben Barnea found multiple vulnerabilities in Fortinet’s FortiOS.
- An unauthenticated attacker can trigger vulnerabilities that may lead to DoS and RCE
- The DoS vulnerability is easy to exploit and causes the Fortigate appliance to be nonfunctional.
- We assume that the RCE vulnerability is difficult to exploit.
- The vulnerabilities were responsibly disclosed to Fortinet, and were assigned CVE-2024-46666 and CVE-2024-46668.
- Fortinet addressed the vulnerabilities discovered by Barnea on January 14, 2025, and devices with up-to-date FortiOS versions are protected from them.
Introduction
In the last few years, VPN solutions have suffered from many critical vulnerabilities that have been exploited in the wild by malicious actors. Some of those vulnerabilities are incredibly easy to exploit and have a devastating impact — an RCE on an internet-exposed VPN appliance. Once inside the network, the attackers can move laterally to gain access to sensitive data, intellectual property, and other high-value assets.
In addition to the initial exploitation of the vulnerabilities in VPNs, Akamai researcher Ori David has also documented post-exploitation techniques and showed that a compromised VPN server could allow attackers to easily gain control over other critical assets in the network.
Unfortunately, security researchers who wish to look into VPN appliances have a hard time beginning their research since firmwares are not always easily available and are protected with encryption mechanisms deployed by vendors. However, given that VPN appliances are prime targets for exploitation, overcoming these protections can certainly be worthwhile for attackers.
In this blog post, we’ll explore the research process of examining Fortinet’s VPN solution. We’ll go through the processes of getting the firmware, decrypting, setting up a debugger, and finally looking for vulnerabilities.
Some of the research presented in this post is not novel — there has been some great research into FortiOS by Optistream, Bishop Fox, Assetnote, Lexfo, and more. We have updated their initial research with the most recent version of FortiOS since Fortinet often changes the encryption and decryption methods, making it harder to analyze the device.
Getting a firmware image
Traditionally, VPNs were sold as a separate physical appliance, which could complicate acquiring them and extracting their firmware. Nowadays, however, it is much more common to find VPN appliances as a virtual appliance that can be deployed to a virtual machine (VM).
Fortunately for us, Fortinet offers a trial VM that one can download from their website after registering (Figure 1). The VM is constrained — only one CPU is allowed and it’s limited to 2 GB of RAM.
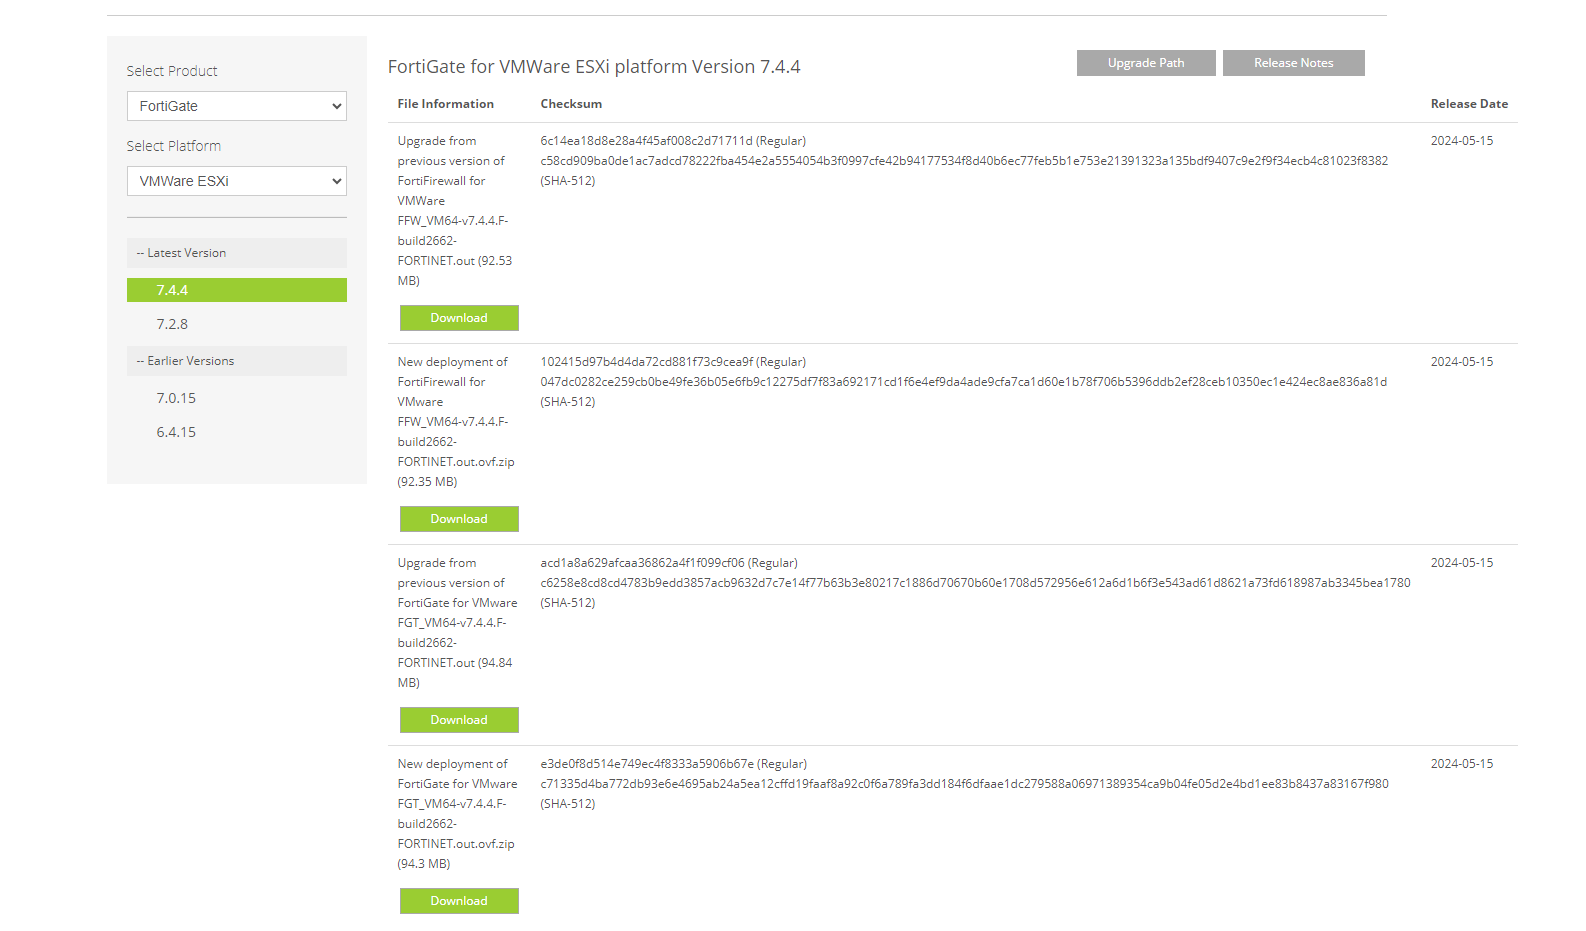 Fig. 1: Downloadable VM trials
Creating a debugging environment
The VM provided contains two points of interest: (1) a boot image, along with a kernel image (called flatkc), and (2) an encrypted filesystem rootfs that contains most of the interesting files. Inside the filesystem, once decrypted, we can find a binary called init inside the /bin/ directory.
Most of the VM’s binaries were statically compiled into this one binary. Two interesting binaries that are present in /bin/init are the SSLVPND and the management web server. We’ll return to those binaries later on in this post.
We wish to create an environment where we have a full shell, and not the constrained CLI we receive from Fortinet. In addition, we wanted to have a gdb binary that would allow us to debug binaries easily.
To create such an environment, we do the following:
- Unzip the GZIP compressed CPIO (a file archive format)
- Use Bishop Fox’s script to decrypt the rootfs
- Untar the bin.tar.xz archive
- Patch /bin/init integrity check
- Convert flatkc to ELF using vmlinux-to-elf
- Find the address of fgt_verify_initrd in IDA, so we can patch it in runtime to disable further integrity checks
- Drop a statically compiled busybox and gdb inside /bin/
- Compile a stub that creates a telnet server; override /bin/smartctl with this stub
- Tar the /bin/ folder
- Repack the rootfs, encrypt it
- Add padding at the end of the encrypted rootfs
- Replace the rootfs in the VMDK using a helper Ubuntu VM (which mounts the VMDK)
The steps illustrated in Figure 2 create an edited VM with debugging capabilities. Since the integrity check of the rootfs fails, the kernel will stop execution. Thus, we either need to patch the kernel (flatkc), and then also patch the bootloader integrity verification code, or we need to resort to dynamically patching the kernel integrity check. We decided to go with the latter approach.
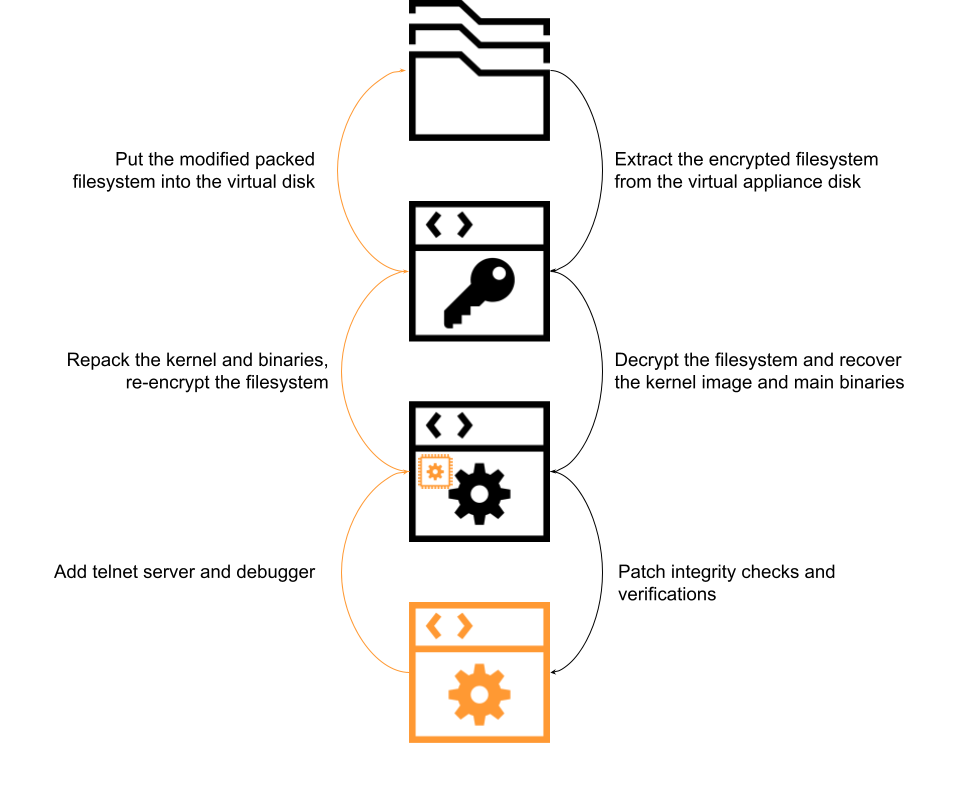 Fig. 2: Patching FortiGate for a research environment
We tried to use VMware’s VM debugging feature by editing the VMDK file. This should set up a GDB debugger that will be available once the machine is run. Unfortunately, we encountered a problem with this feature implementation when running on a machine with Hyper-V enabled. As soon as a breakpoint is encountered, the machine crashes. This seems to be due to incomplete implementation of the kernel debugging feature when run under a Hyper-V machine.
Trying to create a running VM using QEMU
After multiple failed attempts to run kernel debugging with VMware, we decided to try and create a running VM using QEMU. We statically created the modified VM using similar steps, except for needing to convert back and forth between qcow2 and VMDK file formats.
To debug the kernel when using QEMU, we can provide the -s flag to qemu-system. We finally run the VM, attach GDB, and add a breakpoint to overwrite the integrity check, and we are welcomed with the CLI. (Figure 3).
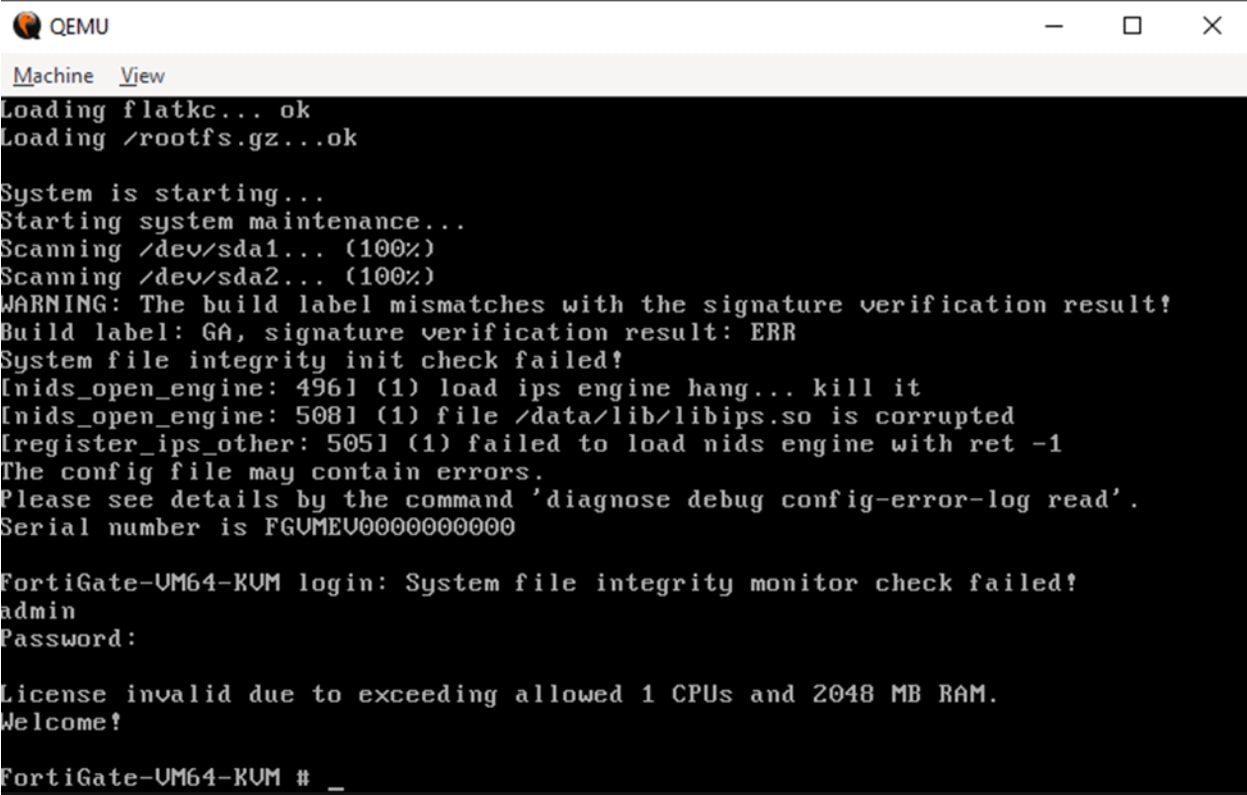 Fig. 3: A working VM with CLI
After configuring networking settings and receiving a valid IP from the DHCP server, we can run the modified smartctl binary that prints the current directory content, Linux ID command and opens a busybox telnet session. (Figure 4).
 Fig. 4: Enabling the backdoor
And finally, Figure 5 shows that we connected to the newly created telnet server.
 Fig. 5: Connecting to the shell
Are we done yet? No.
As you can see in Figure 6, we don’t have a valid license, which prevents us from interacting with the administrative panel.
 Fig. 6: License error
You shall not(?) bypass
At first, we thought the license was invalid because we exceeded the limitation of 1 CPU and 2,048 MB RAM. So, we had two choices: We could either accept this limit and have a very slow VM, or bypass it.
After some reversing, we found the function upd_vm_check_license that is called periodically in a daemon (Figure 7). The function checks that the machine’s RAM and number of CPUs does not exceed the limits.
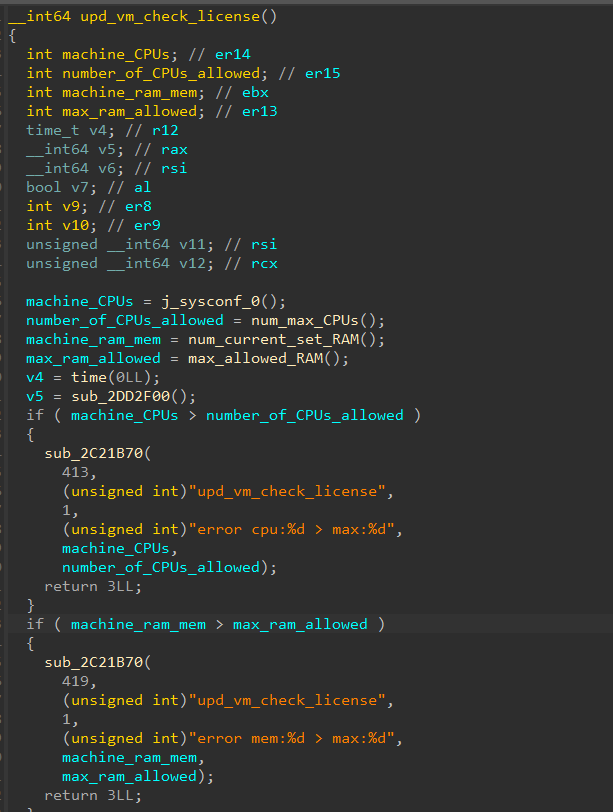 Fig. 7: Decompiled code responsible for constraints of the VM
After bypassing the restrictions by modifying the return value of num_max_CPUs() and max_allowed_RAM() dynamically, we now have a powerful unconstrained VM and receive fewer errors when we boot the machine, but we still receive an invalid license error.
After spending way too much time reversing the license validation function and thinking about the life choices that led us to this, we finally discovered that the license is using the serial key of the machine, which is built using SMBIOS UUID. Since we didn’t provide QEMU with one, it used a NULL one, and this is why the created serial number was “FGVMEV0000000000.” After providing a SMBIOS UUID to QEMU using the following flag:
  -smbios type=1,manufacturer=t1manufacturer,product=t1product,version=t1version,serial=t1serial,
  uuid=25359cc8-5fe7-4d50-ab82-9fd15ecaf221,sku=t1sku,family=t1family
We finally booted the machine and received a valid license.
New version. New encryption. WHY?
At this point, we have a working debugging environment. We began researching the management web server and found some vulnerabilities that we’ll describe later in this post. While finding these vulnerabilities, we noticed that Fortinet released FortiOS version 7.4.4.
We wanted to see if the vulnerabilities still exist in the new release, but after failing to decrypt the updated VM’s rootfs, we encountered a completely different encryption that is even more difficult to crack. This time, we decided to put effort into decrypting the new rootfs, but not into creating a debugging environment, as the main goal at this point was to verify that the vulnerabilities still exist.
So, first let us describe the old way (prior to v. 7.4.4) to decrypt the rootfs:
1. The kernel verifies rootfs integrity, and if it is valid it continues to the next step
2. The kernel calls fgt_verifier_key_iv, which calculates a key and IV as follows:
a. Key: sha256() of a global data
b. IV: sha256() of another portion of the same global data; then, truncates the result to 16 bytes
3. Decrypts the rootfs using Chacha20 with the key and IV above
Now, let's take a look at the new algorithm (Figure 8):
1. Decryption code calculates the key and IV by sha256() of a global data buffer, as in the previous algorithm
2. ChaCha decrypts a block of memory using the key and IV; this memory block is an ASN1 representing an RSA private key
3. Takes d,n from the RSA private key and decrypts a data block present at the last 256 bytes of the encrypted firmware using the known formula M = Cd mod N
4. From the data block, takes:
16 bytes that are nonce + counter
32 key bytes
5. Does AES decryption in CTR mode, with the key and nonce+counter; the code uses a custom CTR addition
6. The addition is the result of XORing the nibbles of the (nonce + counter)
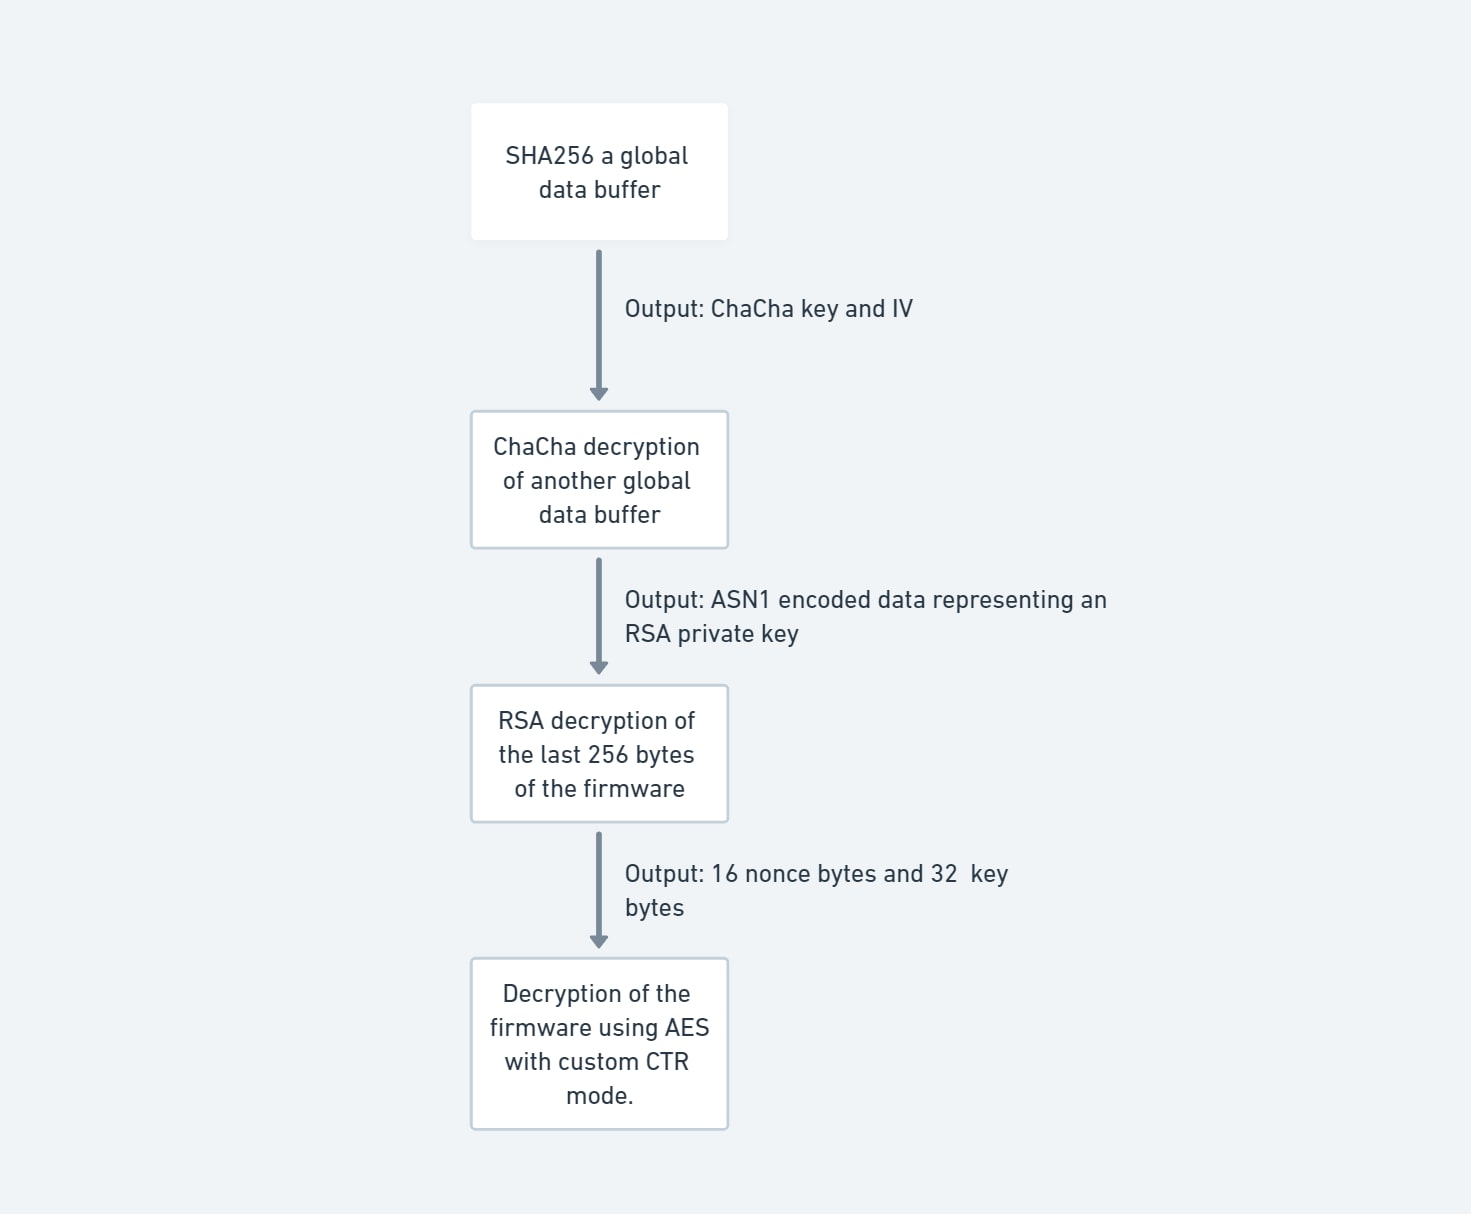 Fig. 8: Firmware decryption flow chart
To add to the complexity of this multistage decryption algorithm, the new flatkc doesn’t have symbols anymore, making it harder to write tools to automatically decrypt the firmware — for example, finding the global data that is used for the ChaCha decryption and the encrypted RSA private key.
After doing all the steps described above, we can view the rootfs (Figure 9).
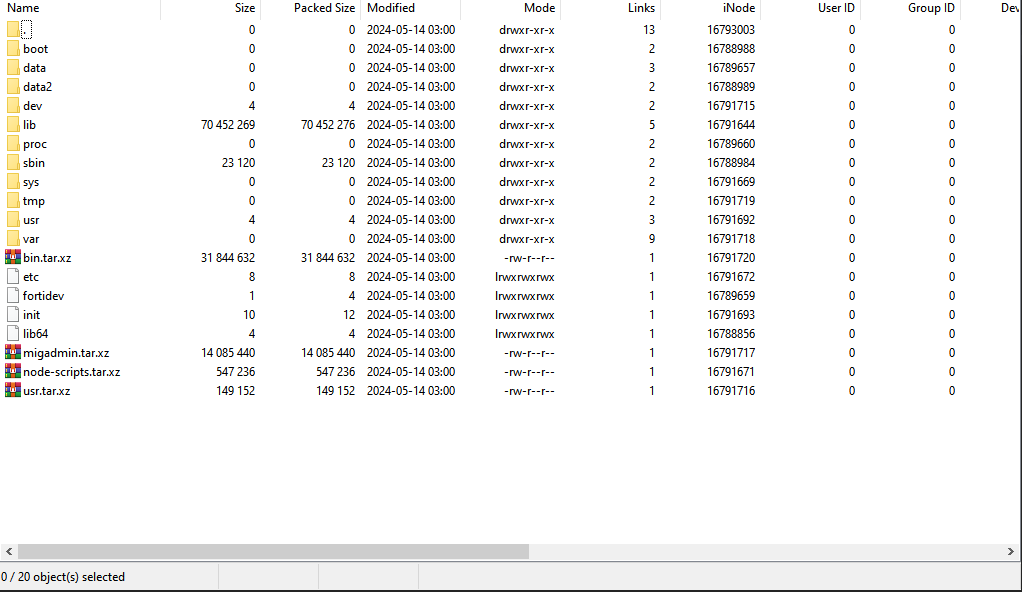 Fig. 9: The tar of the rootfs
This time we did not create a modified environment. Doing so requires creating a rootfs archive that needs to be successfully decrypted as described above. Another option is to dynamically set breakpoints and overwrite the memory with a decrypted rootfs.
Reversing the admin web server
We can finally approach reversing the admin web server. It is based on Apache and, in general, should not be accessible to the internet (as opposed to the sslvpn interface, which is accessible to the internet).
When we open the httpd config, we can notice some location directives that point URLs to their handlers (Figure 10).
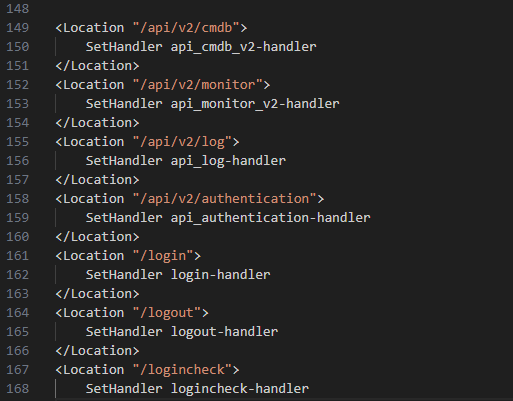 Fig. 10: Snippet of the httpd config file
Then, we can search one of the handler strings in the binary to find the handler table (Figure 11).
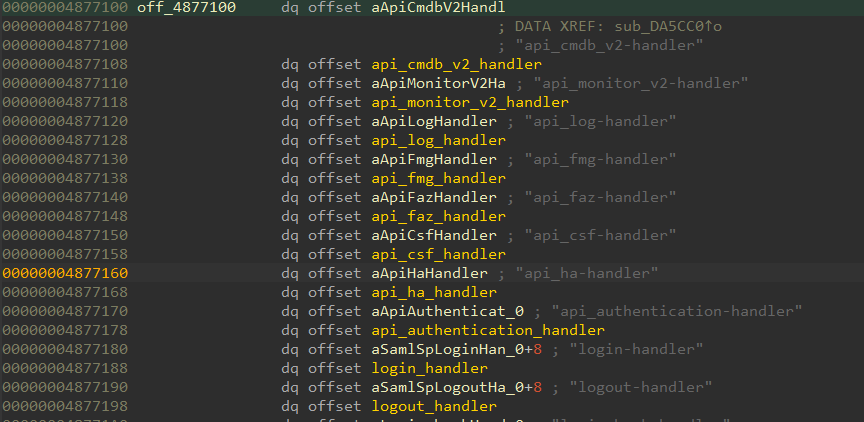 Fig. 11: List of handlers as shown in IDA
Since we were interested in finding unauthenticated vulnerabilities, we decided to focus on the api_authentication-handler that is accessible through the /api/v2/authentication URL.
Before diving into the reversing work, it’s recommended to create some Apache structs and a connection struct into IDA to ease off the work (Figures 12 and 13).
  struct __attribute__((aligned(8))) _request_rec
{
    apr_pool_t *pool;
    conn_rec *connection;
    void *server;
    _request_rec *next;
    _request_rec *prev;
    _request_rec *main;
    char *the_request;
    int assbackwards;
    int proxyreq;
    int header_only;
    int proto_num;
    char *protocol;
    const char *hostname;
    unsigned __int64 request_time;
    const char *status_line;
    int status;
    enum http_methods method_number;
    const char *method;
    unsigned __int64 allowed;
    void *allowed_xmethods;
    void *allowed_methods;
    unsigned __int64 sent_bodyct;
    unsigned __int64 bytes_sent;
    unsigned __int64 mtime;
    const char *range;
    unsigned __int64 clength;
    int chunked;
    int read_body;
    int read_chunked;
    unsigned int expecting_100;
    void *kept_body;
    void *body_table;
    unsigned __int64 remaining;
    unsigned __int64 read_length;
    void *headers_in;
    void *headers_out;
    void *err_headers_out;
    void *subprocess_env;
    void *notes;
    const char *content_type;
    const char *handler;
    const char *content_encoding;
    void *content_languages;
    char *vlist_validator;
    char *user;
    char *ap_auth_type;
    char *unparsed_uri;
    char *uri;
    char *filename;
    char *canonical_filename;
    char *path_info;
    char *args;
    int used_path_info;
    int eos_sent;
    void *per_dir_config;
    void *request_config;
    void *log;
    const char *log_id;
    void *htaccess;
    void *output_filters;
    void *input_filters;
    void *proto_output_filters;
    void *proto_input_filters;
    int no_cache;
    int no_local_copy;
    void *invoke_mtx;
    apr_uri_t parsed_uri;
    apr_finfo_t finfo;
    void *useragent_addr;
    char *useragent_ip;
    void *trailers_in;
    void *trailers_out;
    char *useragent_host;
    int double_reverse;
    unsigned __int64 bnotes;
};
Fig. 12: Apache structs
  struct __attribute__((aligned(8))) conn_rec
{
    apr_pool_t *pool;
    void *base_server;
    void *vhost_lookup_data;
    apr_sockaddr_t *local_addr;
    sockaddr *client_addr;
    char *client_ip;
    char *remote_host;
    char *remote_logname;
    char *local_ip;
    char *local_host;
    __int64 id;
    void *conn_config;
    void *notes;
    void *input_filters;
    void *output_filters;
    void *sbh;
    void *bucket_alloc;
    void *cs;
    int data_in_input_filters;
    int data_in_output_filters;
    unsigned __int32 clogging_input_filters : 1;
    __int32 double_reverse : 2;
    unsigned int aborted;
    ap_conn_keepalive_e keepalive;
    int keepalives;
    void *log;
    const char *log_id;
    conn_rec *master;
    int outgoing;
};
Fig. 13: A connection struct
When reversing the auth handler, we first reversed the POST method handler, named api_login_handler. The function retrieves login parameters from the request by calling api_login_parse_param. This function tries to parse the POST data depending on the content-type header:
If set to “multipart/form-data”, the request has an HTML form
If not, read the plain POST data
The second option is pretty simple, so we mostly focused on the first part. By glancing over the decompiled code we quickly noticed a debug string that pointed us to the libapreq library (Figure 14).
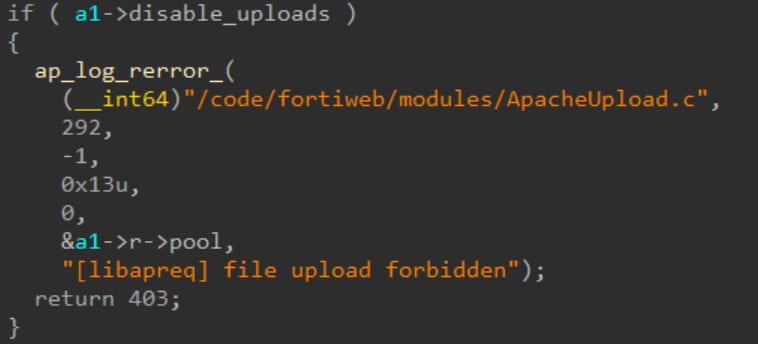 Fig. 14: A string indicating that the code uses libapreq
Since libapreq is an open source Apache library, we (almost) had no reason to look for vulnerabilities in the decompiled code instead of the source code. Thus, the first thing we needed to do was find the library version. After some back-and-forth, we managed to narrow the version by finding a string that is present in the binary and a specific commit, but is removed one commit later (Figure 15).
 Fig. 15: A comparison between the binary decompiled code and the source code commit that removes the string
The surprising part is that the library present in the binary is the oldest available version from March 2000 (Figure 16).
 Fig. 16: The narrowed down version of libapreq
Vulnerabilities
Fortinet uses the module almost exactly as it was 25 years ago, except for very minor changes for optimization reasons. When we first saw this, we thought there was no chance that the code from 2000 has no vulnerabilities. And we were right!
Before taking a look at the vulnerabilities, let’s explain the purpose and the use of the library. Apreq is an Apache library that is used to handle client request data. One common way to receive data from a user is HTML forms. The filled form data can be passed to the server using different encoding methods, but the common ways are application/x-www-form-urlencoded and multipart/form-data.
When multipart/form-data is used, the client (usually the browser) chooses an arbitrary text as a boundary between different fields of the form data. The boundary is specified through an HTTP header. The boundary is also used to indicate the end of the form data (Figure 17).
  POST /foo HTTP/1.1
  Content-Length: 68137
  Content-Type: multipart/form-data; boundary=ExampleBoundaryString

  --ExampleBoundaryString
  Content-Disposition: form-data; name="description"

  Description input value
  --ExampleBoundaryString
  Content-Disposition: form-data; name="myFile"; filename="foo.txt"
  Content-Type: text/plain

  [content of the file foo.txt chosen by the user]
  --ExampleBoundaryString--
Figure 17: Example of an HTTP boundary form (Source)
Now, let’s take a look at some of the vulnerabilities we found, including out-of-bounds (OOB) write of NULL byte, wild copy, device DoS, web server DoS, and OOB read.
OOB write of NULL byte
After multipart_buffer_read fills the internal buffer and looks for the boundary, it returns the string between the current position and the found boundary. The bug is that if the boundary is not at the beginning of the internal buffer, it returns the string after removing the last two characters that are supposed to be the line ending (“\r\n”). The code incorrectly assumes that the string returned length is greater than 2.
In Figure 18, retval is the string returned and start is its length, which equals 1. In this case, blen also equals start. It is then decreased by two to the value -1. We thus have the ability to write NULL one byte before the buffer.
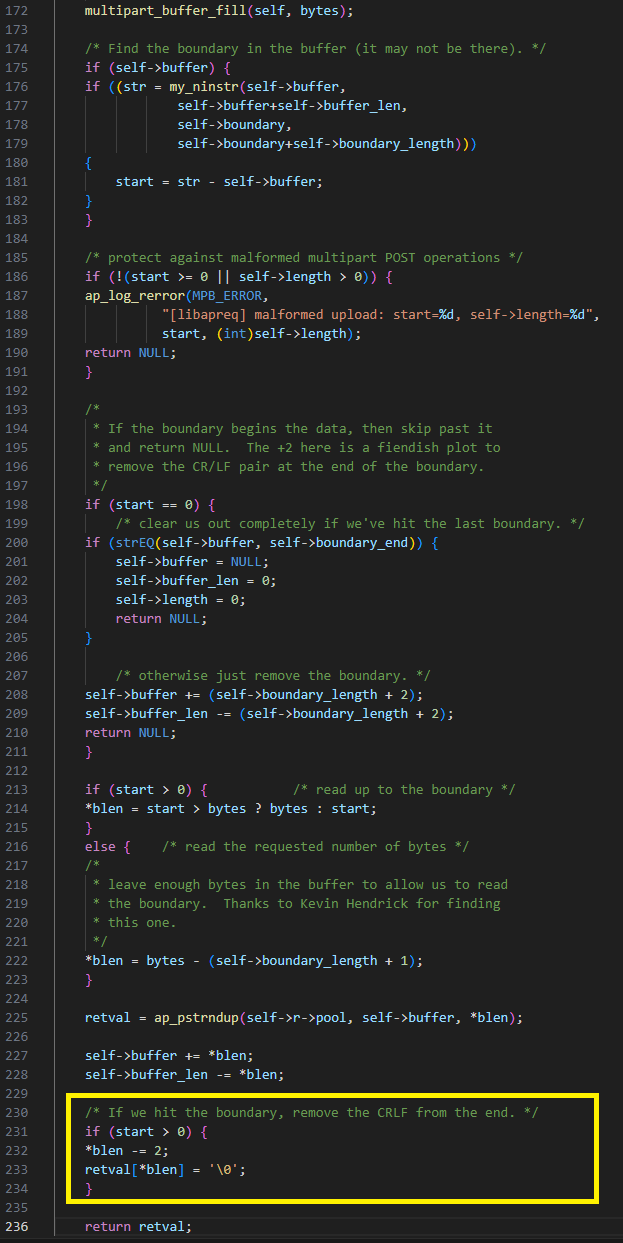 Fig. 18: The vulnerability that leads to an OOB write of NULL before the buffer
Exploitation attempts
Although one byte overflow — even one bit overflow — can be enough to achieve code execution, we believe that this vulnerability is unlikely to be exploitable in practice. First, we can only write a NULL byte, and only one byte before the buffer. The buffer is allocated on the heap; therefore, there are two options:
1. The buffer is the first buffer to be allocated in the heap’s node. In this case, we will have the heap’s node metadata before our allocation (Figure 19).
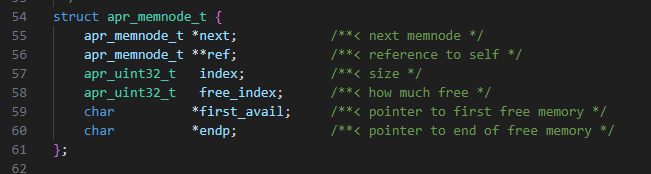 Fig. 19: The struct representing an Apache memory heap node
We will overwrite one byte of endp pointer. This wouldn’t impact the pointer’s value because we overwrite the highest byte of the pointer because of endianness. Since the VM is x64, this byte will always be 0.
2. If there has been an allocation before us, we’ll be able to overwrite one byte of data. Unfortunately, as in the previous example, in most cases, we’ll either have a pointer at the end of the struct, padding, or a C string that is already NULL terminated.
We did find one interesting object: the multipart_buffer C struct (Figure 20).
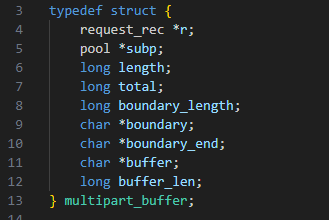 Fig. 20: The multipart_buffer C struct
In this case, we thought we could cause buffer_len, the last variable in the struct, to be negative through the previous vulnerability, and then change it from minus to a large positive value with this vulnerability (by overwriting the MSB byte marking the number as negative).
Although this seemed like an interesting approach, there are two problems:
1. The struct is created only once — when creating the form parser. This means we wouldn’t be able to spray this object easily.
2. Once we used the previous vulnerability, we limited the length read in the filling function. This means that once the filling function ends, self->length is 0 after reading the full request’s POST data. The next time the code calls multipart_buffer_read, it wouldn’t find the boundary in the advanced buffer (since we caused the end pointer to appear before its beginning), and since self->length is 0, it would exit alerting of a malformed upload.
We thought of trying to exploit it in a race condition attempt, but looking at the Apache multiprocessing mode (MPM), we see Figure 21.
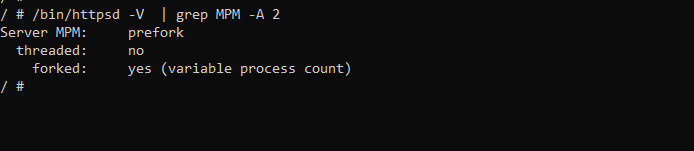 Fig. 21: Checking the Apache MPM mode
This means that Apache will fork multiple processes that each handle a request. We can also notice that those processes are not multithreaded. This means that we won’t be able to exploit it in a race condition manner.
Wild copy
In the same function, multipart_buffer_read, if the code doesn’t find the boundary (start equals -1), it returns only part of the internal buffer: (bytes - boundary_length). The error here is that bytes is set to the constant value 5120, whereas the boundary length can be much larger (to the limit of header length).
Thus, by sending a field in which the boundary is not in the first chunk, and the boundary length is larger than 5120, we can cause blen to be negative. This leads to the code setting self->buffer to before the buffer, and self->buffer_len to a larger value (Figure 22).
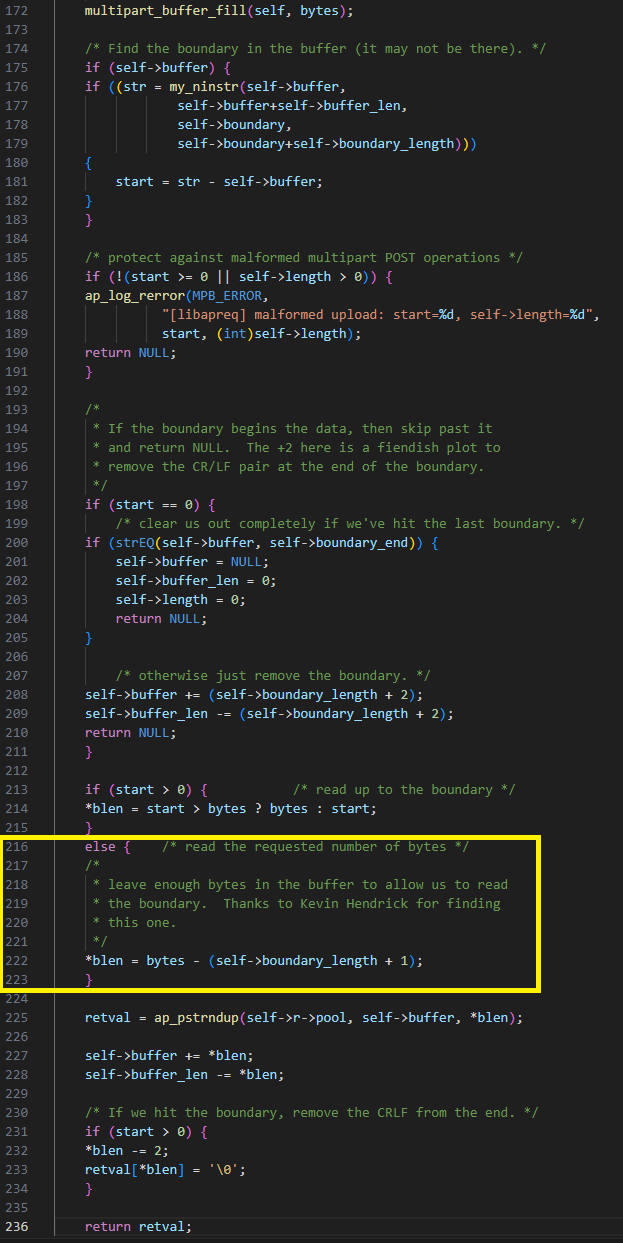 Fig. 22: The vulnerability due to integer underflow
Exploitation attempts
There is a difference between this vulnerability and the previous one — this time since the start is negative (the boundary wasn’t found), we don’t get to the code that writes a NULL byte.
blen is a parameter to the multipart_buffer_read function, so let’s observe the function multipart_buffer_read_body that calls it, and receives blen as an output.
Figure 23 shows that blen is used twice:
1. If it’s the first buffer created, then the string received from multipart_buffer_read is duplicated using blen. In this case, Apache raises an out-of-memory (OOM) error and the code aborts. This can be used to launch a DoS attack.
2. If it’s the second chunk, then the previous one and current one are joined using the function my_join. The function calls memcpy with a negative number, leading to a wild copy.
 Fig. 23: The two different flows in multipart_buffer_read_body
(Some of you might have noticed another bug in this code; this is, old_len is updated to be blen instead of old_len + blen, leading to a truncation of the users data.)
Exploiting such wild-copy would be very difficult, if possible at all. First, we don’t have any option to “stop” the wild-copy — it’s a memcpy with a large size. Second, there’s no multithreading, so we can’t overwrite an object that will be used in another thread concurrently. We assume that the only possible option is to exploit the signal handler if it doesn’t perform a safe exit.
Device DoS
This vulnerability is actually not in the library itself, but in Fortinet’s code that uses the library.
When the user uploads a file through the form, which is specified with a Content-Disposition header inside the POST data (see Figure 17), a new file is created inside the /tmp/ folder with the filename /tmp/uploadXXXXXX, where the Xs are random characters.
For each file upload, an appropriate struct is created and inserted into a linked list of uploaded files. The bug appears at the end of the parsing when only the file in the first node of the linked list is deleted. This allows an attacker to initiate an attack by filling the /tmp/ folder. Since /tmp/ is a tmpfs filesystem, the data is stored on RAM. This leads to a full system OOM case, which causes the device to get stuck.
Only restarting the device returns it to normal use — and even that is not guaranteed. In one of our attempts, we caused some sort of a network brick to the device: Even after restarting the device, the network functionality didn’t work properly, and we were unable to use or connect to the device.
Exploitation attempts
This vulnerability is pretty easy to exploit. All it takes is to just repeatedly send requests with a form containing multiple files. After a short time, the device will be stuck (Figure 24).
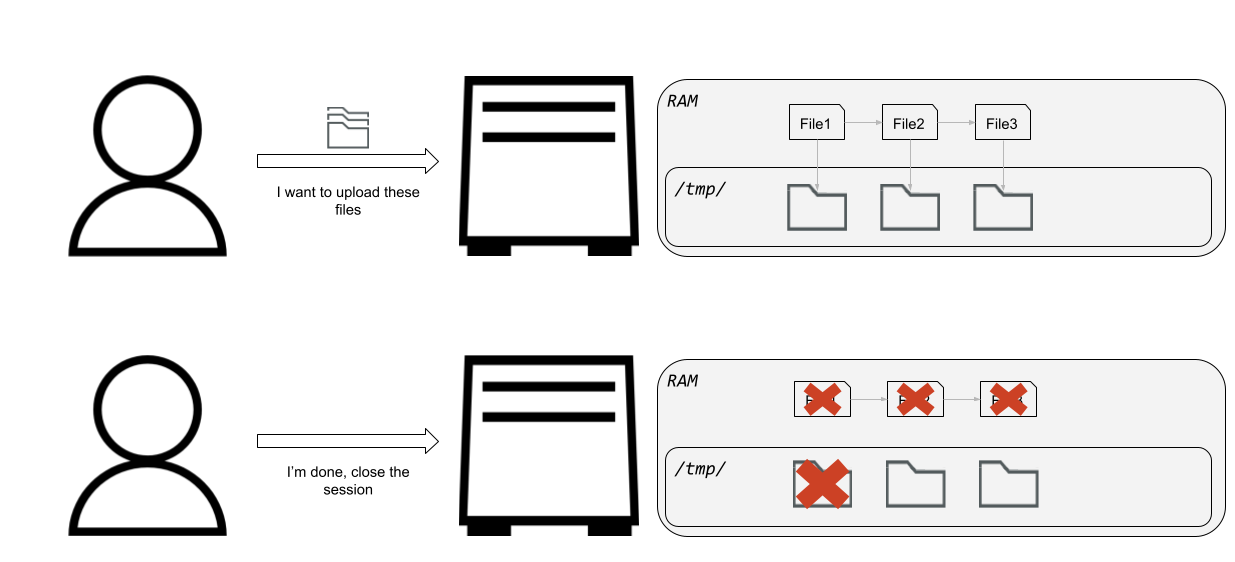 Fig. 24: Filling out the VPN appliance’s RAM with undeleted files, eventually achieving DoS due to insufficient memory
Web server DoS
This is a minor vulnerability in the function multipart_buffer_headers. It calls multipart_buffer_fill, whichfills the internal buffer, and then it looks for a double line ending in the internal buffer.
The bug is that the code doesn’t check that the internal buffer is valid after calling multipart_buffer_fill. If the client dropped the connection while multipart_buffer_fill was waiting for input, it sets the buffer to NULL and this leads to a NULL dereference (Figure 25).
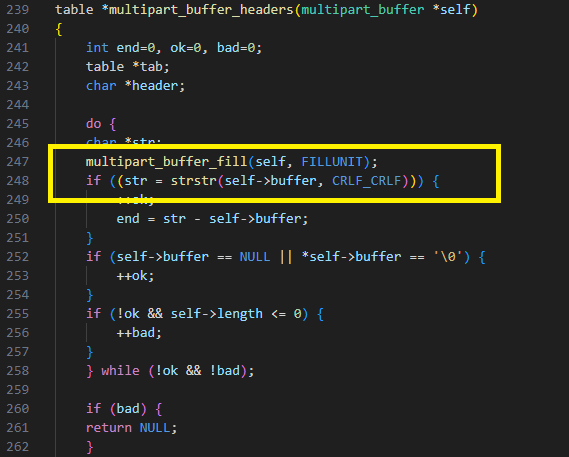 Fig. 25: Accessing the internal buffer without checking if it’s valid
Exploitation attempts
This vulnerability is also quite easy to exploit. An attacker can create multiple threads that create a connection and send the crashing request. Since Apache pre-fork MPM does not provide great performance, the server won’t be able to handle the multiple crashes and won’t be able to serve other clients while the attack is underway.
OOB read
The library uses an internal buffer that is filled regularly. When it is filled, the calculation of how many bytes to read is as follows:
1. Calculate (bytes_requested - current_internal_buffer_len)
2. Add boundary length + 2 (for “\r\n\r\n”)
3. Calculate the minimum between this result and the available bytes to read from the POST data
The vulnerability is in multipart_buffer_read. If it found the boundary at the beginning of the internal buffer, and it’s not the boundary that marks the end of the form, it advances the internal buffer pointer past the boundary, and adds another 2 bytes for the line ending.
The error here is that an attacker can cause the internal buffer to be exactly the size of the boundary, thus causing the code to advance past the end of the internal buffer by two bytes (Figure 26). This can be done since we can “limit” the internal buffer calculation by providing a lower amount of bytes than the boundary_length + bytes_requested.
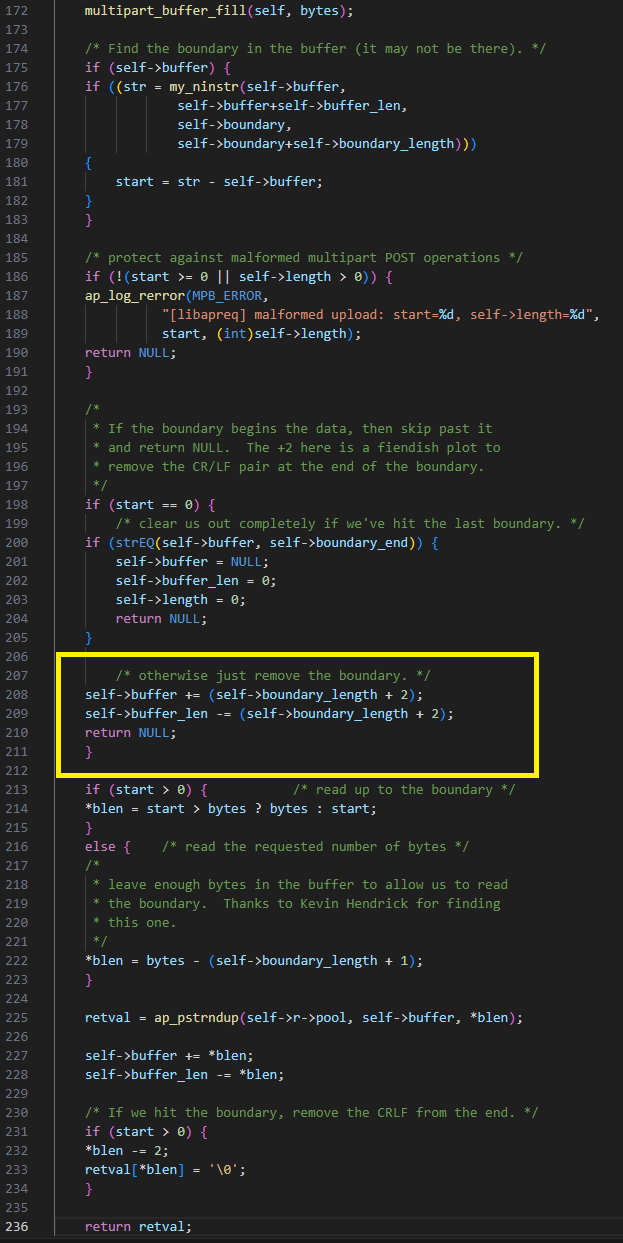 Fig. 26: Advancing the internal buffer past its end
Exploitation attempts
As seen in Figure 26, the code returns NULL. Yet, as we saw in the previous bug, the code in multipart_buffer_headers accesses the internal buffer directly, and not the return value. This will cause the code to look for the “\r\n” after the buffer, and return it as a header.
In the use of apreq in the login handler, the code reads the form fields, but it doesn’t send them back to the client, so we can’t use the OOB vulnerability as an info leak in this case. The library is also used multiple times in the web server, but it seems like those are only available to authenticated users, so at most an attacker with low-privileged user credentials might use it as a privilege escalation vulnerability by reading high-privileged user credentials from memory.
SSLVPND
SSLVPND is the daemon responsible for handling the SSL-VPN component of Fortinet. It is accessible to the internet. The apreq library is also used in the SSLVPND. The library used there is based on the same old version of apreq, with some modifications. All the vulnerabilities described above, with the exception of the Device DoS vulnerability, also exist in the SSLVPND.
Unfortunately, we were unable to trigger the apreq library in SSLVPND, so we are unable to confirm whether those vulnerabilities are accessible to unauthenticated users, or whether those vulnerabilities might happen to be exploitable under the SSLVPND context.
Summary
Attackers often target VPNs due to their nature of being internet-accessible. In this blog post, we looked at one example of an approach to research a VPN appliance. Although no critical vulnerabilities were identified, we believe it’s safe to assume there are additional vulnerabilities waiting to be discovered.
As VPNs are a gateway into the organization's network, vulnerabilities in those appliances have a major impact on organizations. We hope this blog post will also encourage other security researchers to look for VPN vulnerabilities.
